Please support our sponsors and let them know you heard about their products on Cruisers Forums.
11-07-2023, 15:05
Boat: Columbia 10.7
to my for a couple of years. We have sailed in all conditions and having some shade on a sunny day or shelter in rain would be really handy. My original plan was to get some tubing and have it fabricated from my own designs and then have it attached to my existing stern pulpit.
In our area, this was harder than I thought it would be, but a friend suggested using tubing connectors to assemble the frame. So, last I set about designing the frame and down the connectors that would put everything together.
I ordered the connectors and several 1" tubes from , but the longest tube they sell is 7 feet. I needed 8 footers to span my . A friend who owns a machine shop ordered 2 - 20 foot tubes and even cut them to my specifications. By spring I had everything in place and we were planning a 10-day on Lake Michigan for the end of June. I had only a couple of weeks to put everything together and then cut and sew the .
Everyone who saw my initial design kept suggesting that I bend the cross members to put a slight arch in the Bimini. I borrowed a tube bender and put a 3-4 inch arch in the tubes. I cut the verticals and the two side tubes and started assembling everything.
Working alone, I installed the vertical supports and had the sides and cross members nearly finished and suddenly the port side tube fell off into the next to the pier. I was devastated. My pier neighbor happens to be a diver so I asked her to help and she came out a couple days later and rescued the tube and from Davey Jone's locker.
This time I tied parachute cord on every tube and put some tension on the ropes. I had no more tragedies and in less than 3 hours the entire frame was complete. I then measured the finished dimensions, which were surprisingly similar to my original design.
Another friend owns a shop and me some Sunbrella and allowed me to use one of his sewing machines. (I had constructed my cover there a couple of years earlier.) Making the Bimini cover took only about 4 hours, including the window in the center to allow me to see the and windex. Another hour later I had grommets installed on all four edges. The Bimini cover was ready to install.
The next day, I brought the cover to the boat and started installing it. I started at the front edge, thinking that if I was off on my measurements, I could hide the error at the back end which hangs over the . It only took about an hour to lace the cover to the frame. And it looked marvelous.
Eventually, I may make another version with flaps to allow me to attach sides and a back to create a little cuddy for cold sailing. I may just leave it as is, since it looks and works so well, so far.
The final goal is to get the frame welded to the stern pulpit to provide a bit more strength and and side braces. The connectors are nice but one good push could tip the frame over to one side. I have web straps to replace the last few parachute cords but after nearly a month, everything seems to be working exactly as I envisioned it.
11-07-2023, 17:46
Boat: O'Day 30 CB
12-07-2023, 00:31
Boat: Outremer 55L
grommets edge as the inner flap, and sew on extra material on each edge (back from each grommet edge so that they are effectively a flap and accessible from both sides for tensioning line) to wrap over and around each pole. Use double material for chafe resistance and strength not just for the edges but along the poles as well - its along the poles where a canvas bimini wears with every flap of the material.
13-07-2023, 09:26
Boat: Columbia 10.7
13-07-2023, 09:55
Boat: 1980 Gulfstar 47 Sailmaster
13-07-2023, 11:47
Boat: Columbia 10.7
13-07-2023, 12:03
Boat: TES 246 Versus
on my boat, though not as elaborate.
For cheapskates who are interested in copying your , I came up with a simple method for making large radius curves in tubing. I make a form from a 2x10 (or whatever width is required for the bend radius and length) and cut a round groove along the curved edge with a quarter-round router bit. (Once each direction, to make a half-round groove.) Then I clamp one end of the tube and pull the other end down over the form with whatever means is handy (usually another clamp).
The radius on the form needs to be quite a bit tighter than the desired bend radius because of spring back. I found a formula on the web to estimate the spring back but, in the end, I determined the radius on the form by trial and error.
13-07-2023, 13:06
Boat: 1980 Gulfstar 47 Sailmaster
17-07-2023, 13:01
Boat: Columbia 10.7
17-07-2023, 13:40
Boat: Bristol 29
09-08-2023, 12:06
Boat: Columbia 10.7
30-08-2023, 17:23
Boat: Beneteau 461
does one need to work with the materials needed for a bimini?
30-08-2023, 17:42
Boat: Columbia 10.7
does one need to work with the materials needed for a bimini?
30-08-2023, 17:47
Boat: Sabre 402
30-08-2023, 21:17
Boat: Albin Vega 27'
.
Here's one like mine, maybe a bit overpriced.
Sent from my SM-A536W using
Thread Tools
Rate This Thread
:
Posting Rules
post new threads post replies post attachments edit your posts is are code is are are are
Similar Threads
Thread
Thread Starter
Forum
Replies
Last Post
hd002e
Construction, Maintenance & Refit
69
28-10-2023 21:53
Svenn
Plumbing Systems and Fixtures
0
16-04-2017 11:15
albergsailor
Monohull Sailboats
30
25-09-2012 09:15
forsailbyowner
Deck hardware: Rigging, Sails & Hoisting
9
13-06-2012 08:43
wolfenzee
Liveaboard's Forum
2
02-06-2010 12:55
- - - - - - -
Privacy Guaranteed - your email is never shared with anyone, opt out any time.
Building a Sailrite 3-Bow Bimini
First, I’d thank everyone for the concerned questions, comments, sincere emails and vicarious anger regarding our arch project. I’m hopeful this post and video will answer all your questions, and we can finally put the “ arch saga ” to rest.
To get a few things out of the way…
Yes, we tried our best to get our money back.
No, we did not get any money back.
No, suing them didn’t seem like it would yield any positive results.
No, we don’t want any legs broken.
Yes, we filed a complaint with the BBB.
Yes, we wrote reviews on every review site imaginable.
No, we will not give out their information publicly.
Yes, if you want to get similar work done in the area, and are concerned about hiring them, we’re happy to share the information privately to ensure you don’t.
Now that the past is in the past, let’s focus on the future, and all of the awesomeness that is the custom bimini we constructed and sewed ourselves! This project was a game-changer for us for a couple of reasons:
Shade — This cannot be overstated. Our cockpit was miserable on sunny days. There was nowhere to hide from the sun, and without a reliable autopilot we were forced to stand at the helm in full sun all day long. Sailing all day in the warm tropical sun may sound alluring, but it’s not. It’s terrible . It’s unbearably hot, it sucks the energy right out of you, it literally kills you! 1 in 5 Americans will develop skin cancer by the age of 70 and more than 2 people die of skin cancer in the U.S. every hour. ( source )
Solar Power — The other major reason we wanted a bimini was to have more space to mount our solar panels. We made do at the end of the previous sailing season by lashing them down to the foredeck when we were at anchor, but this was an inconvenient and hap-hazard approach. The bimini gave us the opportunity to more than double the amount of solar panels (160w to 420w) that we have mounted on the boat, allowing us to generate more power than we need on a regular basis. This revolutionized our cruising lifestyle. No more running to a marina because the batteries were low, in fact we don’t even plug in when we are at a dock because we always have power. How cool is that?
Why did we decide to build a bimini ourselves?
After the arch debacle, we got so many recommendations, referrals and generous offers to help… but to be honest we were a little shell shocked. We did eventually speak with a few people who came highly recommended along the Florida gulf coast, and received quotes from a couple companies while we were hauled out for hurricane season.
We also considered buying a cheap off-the-shelf bimini just to have something on the boat until we found the perfect company to build the arch we always dreamed of. But we decided doing this ourselves was the most sensible option for us.
One of the big attractions to this sailing adventure has always been about gaining new experiences, gathering new skills, pushing the boundaries of our comfort zone, and becoming more independent, self-reliant, and self-sustaining.
So, in addition to getting exactly what we wanted and being relatively affordable, building a bimini ourselves allowed us to learn some new skills — and that sealed the deal.
Sailrite 3-Bow Bimini & Skin Kit Review
Having never built a bimini before, and having only dabbled in small sewing projects, we turned to Sailrite for help. They have a series of fantastic tutorials for all sorts of Marine Sewing Projects , including How to Make a Bimini Top , and they sell all the supplies and equipment necessary to complete the project.
It can be extremely daunting to get started, but the tutorials provide a ton of information and make it so that even a complete novice can turn out a good-looking product with a little patience and perseverance.
Based on our experience, we recommend watching the entire How to Make a Bimini Top video before beginning construction. Written instructions were provided as part of the kit, but many times we’d get ahead of ourselves following the written instructions, only to find that they weren’t as clear or detailed as we wanted them to be, so we’d jump back to the video and realize that we had misunderstood something that had been shown more clearly in the video.
The frame and the fabric are actually two separate products. This was a bit confusing at first, but makes sense. If you just need to freshen up an old bimini, you can order the 3-Bow Bimini Skin Kit which includes all the materials you need to measure, template and sew a replacement bimini to fit over your existing frame. We didn’t have a frame to start with so we needed both. We chose the 1″ Stainless Steel 3-Bow Frame Kit to match the existing 1″ tubing on our dodger.
We chose a light “silver” Sunbrella material, in an attempt to reduce the heat underneath. This was based on some loose scientific testing we did on our boat while in Key West. We used our infrared thermometer to test a bunch of different surfaces around the boat on an unbearably hot day. The underside of our dark blue dodger registered 135°, and you could feel the heat radiating from it on your head. For perspective: the bare deck was 120°, but underneath our white boom tent it was just 90° — very near ambient air temperature.
The Frame Kit comes with a bunch deck hardware, including nylon tie-down straps, all of which was unnecessary for our installation on the stern rail. The Skin Kit also included a spool of standard thread, but we wanted to use the UV-resistant Tenara thread, so we ordered a separate spool.
We placed our order online, but had we known that Sailrite also sells all of the pieces in the kit individually and will happily customize your order over the phone to meet your specific needs, we would have saved a quite a bit of money on all the unnecessary hardware we received, and wouldn’t have had to donate it all to the boatyard’s free bin.
Sailrite LSZ-1 Sewing Machine Review
We had initially planned to use an antique White sewing machine a friend had gifted us, but after a couple of days trying to troubleshoot tensioning issues with the incredibly thick Tenara thread, we were able to borrow one of the legendary Sailrite LSZ-1 Sewing Machine s to finish the project. (We then promptly went out and bought one for ourselves shortly after finishing the project).
This sewing machine is a beast. Unless you own an industrial sewing machine, there’s probably not another one on the market that can do what this thing does. It is incredibly heavy, very solid, well thought-out and appears to be very well built. It is unlikely we could have sewn through the 7-8 layers of Sunbrella material we needed to complete the job with anything else. The number of layers mixed with the diversity of material (Sunbrella, vinyl, zippers, binding, sticky tape) combined with our lack of experience made it a bit tricky at times to get proper tension on the machine we borrowed. But we should note we haven’t had this issue with the unit we purchased. All said and done, we’re extremely happy with our Sailrite machine and look forward to many more projects with it.
The Frame Construction Process
The reason this kit is DIY-able is that the bimini bows are shipped in 3 pieces. This caused us some serious hesitation at first. We really wanted a single piece bow that was custom bent to match the lines of our boat.
That said, the 3-piece bow was a necessity for economical shipping, and it allows the builder to customize the width to fit their needs. However it also meant that without modification we were going to end up the dreaded “soccer goal” look (straight legs, with 90-degree bends and a nearly flat top.) We really wanted our bimini to more closely follow the lines of our boat.
This was a non-starter for us until we discovered our neighbor had a pipe bender we could borrow, which allowed us to modify the center section of the bows to add more “crown” or arc, to the top. This helps the bimini shed water more easily, and gives it a more rounded appearance which more closely matches the look of our dodger.
The thought of a loosely held-together bimini frame rattling in the wind with potential for corroded mechanical fasteners failing someday definitely gave me the willies. But after putting it all together, I’m happy to report that the stainless rivets provided by Sailrite combined with the tension of the finished Sunbrella material itself really do a good job holding everything together, and I haven’t even thought about the frame being separate pieces since finishing up construction.
Design Decisions
All of our building decisions revolved around 4 key design considerations :
We needed space to install our 4 semi-flexible solar panels (2 x 80w & 2 x 50w) that we purchased for the project.
We needed the bimini to be tall enough for both of us to walk under without feeling like we had to duck, but no taller.
We wanted to taper the width of the bimini at the stern to follow the lines of the boat.
We wanted a window above the helm to view the masthead for wind direction & sail trimming.
We went through a number of rounds of discussion before even agreeing on where exactly the first bow should be mounted to the boat. We spent a couple of days sitting in the cockpit, while taking breaks between other projects, holding the bimini bows in different positions, debating the pros and cons of each placement of this part or that, trying to envision the finished bimini to get a feel for how each of the decisions we were making affected all the others components of the design.
Ultimately we decided to mount our frame on the forward end of our stern rail, and we’re very happy with that decision. This saved us from drilling a bunch of holes in our cored deck, significantly shortened the length of the stainless tubing we needed (meaning less clutter, less windage, and less weight in the stern of our boat). It also kept the coaming clutter free, one of our favorite places to sit while heeled over underway, and eliminated any possible interference with the primary winches used for trimming the headsail.
This mounting position allowed us to get just enough height to clear my head, while leaving enough room for the boom to easily clear a future bimini-to-dodger connection. Then, the other two bows were be mounted on the leg of this first one. This technically meant we were building our bimini in reverse (meaning our “primary” bow was the forward bow instead of the aft) which caused some confusion for us down the road.
The secondary/aft bow was just as tricky as the first. We wanted the aft bow to give good shade coverage for the helm seat, but we had to contend with the backstay and the radar pole. We went back and forth about the merits of putting this bow in front or behind the radar pole, and ultimately settled on behind. This gave us the most shade and space for our aft solar panels, but made a more complex sewing job to accomodate an opening for the pole in the fabric.
The last/middle bow, which on most bimini kits is probably the easiest, was just as difficult as the first two for us. Since our bimini was going to be a trapezoid instead of a square/rectangle, not only did we need to figure out how long the legs should be to create the appropriate peak in the middle to shed water, we needed to triangulate exactly how wide it needed to be to ensure that it perfectly bisected the angle created by the fore and aft bows. This was easier said than done, because before we could do that we needed to know exactly how much space we needed between each of the pairs of bows to accomodate our solar panels while still leaving room for a viewing window. Whew!
To help us with this, we mocked up our solar panels using some scrap foam insulation and awkwardly held them in place while trying to take measurements fore and aft. All and all we didn’t make this a simple job for ourselves.
Creating the Fabric Skin
After finalizing the construction of the frame, the next step was to create the template which is used to cut out fabric for the bimini canvas. Sailrite provides all the necessary materials for this in the kit which is really nice. This is where watching the full video first would have been very helpful, as we were tripped up here a number of times trying to figure out where to mark and cut the template.
The goal is to get the fabric to lay as smoothly as possibly over the frame without stretching it. Any wrinkles that show up here will be transferred and amplified in your final product. It took us a few attempts to get the templating material to lay down the way we wanted it. Having two people for this stage is an absolute necessity, and doing it on a calm day is very much advisable.
The final stage is sewing! Again, we didn’t do ourselves any favors here. We had only completed the frame before leaving the boatyard, which meant we’d need to complete the entire sewing project while in the water. We spent a good couple of weeks hanging out on a mooring ball in Marathon, carting the sewing machine into the workshop every day via dinghy and bringing it back every night the same way.
A lot of the decisions made during frame construction resulted in more complicated work here as well. We needed a slit on the aft side to accommodate the backstay, more openings for our radar pole and for the vertical rigid stainless supports we added to the back rail in lieu of nylon straps, and the solar panel cables that needed to be run down to the cockpit. Each one of these required a bunch of planning, measuring and intricate finish details that complicated the sewing process.
Solar Panel Mounting
And if that wasn’t enough (!), we had to figure out how best to attach our semi-flexible solar panels. I used some old paracord I had lying around when we were in Mobile, Alabama to create (what I thought would be) a temporary mounting arrangement for the panels on the dodger. This worked well enough there, but we were hoping for a cleaner, more professional looking attachment on the bimini.
We landed on using high-strength Velcro on the bottom of the panels to attach them to the canvas. We then added flaps that wrapped around the edges of all four sides and were secured with more Velcro on top. The idea was that the velcro on the bottom was probably enough, but the flaps would keep the wind from getting underneath and prying the panels away from the bimini. In the end I think this system was a bit overkill, and if we were to do it again, we’d modify it slightly…
We’d still put Velcro on the bottom, as this held very securely. But instead of putting flaps all the way around we’d make small pockets in each corner with grommets in them just large enough to match up with the grommet in the corners of the panels. We’d then use a very small bit of paracord to lash them onto the fabric pockets on the bimini, in a belt-and-suspenders approach.
Final Thoughts
We are incredibly happy with the final results. We learned a ton of new skills, we acquired some fun new tools, and have a lot of experience to rely on if/when we decide to tackle a similar project. The bimini has massively increased the comfort and enjoyment we get out of spending time on our boat. We were finally able to get all of our solar panels mounted, which keep the batteries topped up and has allowed us to stay away from the dock for months at a time. We’ve been able to sail all day in the comfort of the shade without feeling burned up and drained. And we’ve significantly increased the functional living space on our boat, which is hard to come by on a vessel this size.
Let us know what you think!
Do you have a bimini on your boat? How did you mount your solar panels? What would you have done differently? We’d love your feedback.
Watch All our Coppercoat Videos
About the Author: Kirk
Related Posts
Coppercoat as a DIY Project
Is Coppercoat the Best Antifouling for Your Boat?
What’s the deal with Centerboards?
16 comments.
Your new Bimini that put together…looks outstanding…job well done…How did the fuel tank install go..?..We love your videos..from Mike Cindy in Charleston..SC…Please stay safe out there…l
Hi Michael, fuel tank install went smoothly. We didn’t video much because it just sorta dropped in and we were all set!
Could be just an optical delusion, but the Bimini makes your boat look smaller. Kind of resembles a 1947 Buick Convertible. Maybe you need a bigger boat.
We definitely need a bigger boat. I need just a tiny bit more headroom, and she’s always been missing a hull.
Nice work. I have used Sailrite for several small projects snd the kits are very complete. The ability to customize to your own situation is great. The dyi videos go a long way to clarify the process. Keep up the adventure.
Thanks Rich! It would have saved us a bundle if we’d have known we could customize the kit. We had so much useless hardware for our project!
First, I must say that your videos and articles are a joy. I look forward to each new installment. When your website started using the overhead view of Soulianis sporting a new bimini, I hoped you would soon get to the design and construction process you used. I just knew you would do a great job bringing us along and as usual you have exceeded expectations.
I can confirm two points you touch on in the article. First, boaters need to stop cooking themselves to a crisp on the water. I am pushing 70 now, and a lifetime of powerboating and sailing is starting to catch up with me. UV skin and eye damage is a real thing! Shade from the damaging UV rays is vital for your health and shade makes time on the water much more enjoyable. In 2001 I bought an Islander 26 in Boyne City , MI and sailed/powered her back to my home in Peoria, IL. It was the end of July and little or no wind and cloudless days made the 90+ temps miserable. After I dropped the mast in Chicago, I was able to jury-rig a sort of pup-tent using the jib over the mast, but it still was a very hot, sticky trip. If only I had a bimini.
10 years later I found myself on a small lake with a pontoon boat where I learned another point you mention. I had salvaged some stainless steel bows and hardware from a local marina and was setting up a bimini on the pontoon boat. I was using inexpensive rip-stop nylon fabric since all I was after was the shade. I was sure glad I did because the first attempt at fitting the fabric was a miserable failure. There is a heck of a lot of geometry playing some serious games with the shape and fit of the fabric. The first failed fabric ended up being tweaked and changed until it was a proper fit, then used as a template to sew a properly fitting final cover. Anyone attempting canvas work should always consider a template.
Anyway…great job on yours. I looks fantastic.
Hi Dennis, thanks for sharing, glad to hear you’re enjoying the posts. That templating sure was stressful!
Great job! Looks like it was always meant to be there.
Thanks Rob! That’s exactly what we were hoping for 🙂
hopefully, this video is coming to YouTube soon?
It will be up shortly. We had a little glitch and this post went out pre-maturely… 🙂
Hey guys, I’m getting ready to start sewing my Bimini skin. I also ordered the kit from Sailrite. Here’s the question…. Should I pattern from my old Bimini? It already has the cut for the back stay, ext, or should I try to make a new one with the provided plastic material?
Hi Jason, I think if we had a previous bimini that fit well we would have tried to take measurements from that. However that said, I know that over time the canvas moves. I believe the UV shrinks it a bit, but at some point it also probably stretches due to being old and worn out. So if you go this route, I’d suggest doing a bit of research on the best steps for accounting for this and how to use the old one as a pattern.
I’m sure you’ve seen the tower in the link on many boats. It pretty closely matches the drawing you did in Mobile. They’re not really expensive and are pretty easy to install (if there’s enough cold beer on the pier)! It would mount behind your new bimini and you can hoist the dink with it! https://www.atlantictowers.com/products_sail_arch.php
Thank you for sharing! Yep we’ve seen Atlantic towers. At the time it didn’t seem like a good option for us, their designs are somewhat limited and we weren’t going to be able to get davits and an integrated stern rail like we had wanted. In the end they probably would have been a good choice 🙂 Perhaps we’ll give them a go on the next boat 😉
Leave A Comment Cancel reply
Save my name, email, and website in this browser for the next time I comment.
BOAT OF THE YEAR
Newsletters
Sailboat Reviews
Boating Safety
Sails and Rigging
Maintenance
Sailing Totem
Sailor & Galley
Living Aboard
Destinations
Gear & Electronics
Charter Resources
Ultimate Boating Giveaway
Homemade Hardtop
By Tor Pinney
Updated: October 23, 2015
In warm climates, where so many of us keep boats or aspire to cruise, fabric bimini tops and spray dodgers suffer the wrath of year-round sun and exposure to the elements. First they start leaking, and have to be waterproofed periodically. Then the thread breaks down, requiring more and more re-stitching. Finally, at least on Silverheels , my ketch-rigged Pearson 424 built in 1978, the whole shooting match needs to be replaced every five to seven years. It’s a bothersome, costly, recurring maintenance item.
Not surprisingly, permanent fiberglass and composite hard dodgers and biminis have gained wide popularity among sailors seeking longevity and low maintenance from their cockpit protection. However, unless your craftsmanship is well above average, designing and fabricating such structures is best left to professionals, and that can get expensive.
All that said, I’m possessed of modest carpentry skills and an equally modest cruising budget, and yet I’ve come up with what I believe is an excellent compromise for the casual do-it-yourselfer. When Silverheels’ spray dodger top and bimini needed replacing, I made my own with fiber-reinforced plastic (FRP) panels from Home Depot. Yes, Home Depot.
Durable, flexible FRP panels come in 4-by-8-foot sheets and, last time I looked, cost less than $40 apiece. Commonly used for paneling bathroom walls in homes, they feature a raised, textured, high-gloss white finish on one side, and are flat and dull on the other. The best thing about FRP is that it can be cut, drilled and shaped using ordinary carpentry tools.
I wanted something substantial on my bluewater cruiser, so I opted to laminate a pair of panels, back to back, for my dodger and bimini tops. I scuffed the flat sides and glued them together, leaving the handsome texture facing out on both the top and bottom. One-gallon cans of the FRP adhesive made by Liquid Nails sell for around $25. Pick up a grooved trowel to spread the stuff properly. The only other material expenses of note are the stainless-steel fasteners to mount the pieces. You could also add a foam core for an even stiffer, stronger structure. The other option is to keep it really light and simple by using single sheets and skipping the laminating process altogether.
I actually made my dodger hardtop years before the bimini, when I was first refitting my good old ketch. It turned out well and has lasted perfectly with zero maintenance, so recently I decided to do something similar to replace my aging Sunbrella bimini top. In both cases I used the existing stainless-steel tube framework, simply replacing the Sunbrella covers with FRP.
The dodger top was relatively quick and easy to fabricate. I made a template with door skin (thin, flexible wood veneer), cut the first pieces from an FRP panel with a jigsaw, and then cut mirror-image pieces to glue on top. Clamping the bottom pieces onto the dodger frame, I then spread on the adhesive and clamped on the top laminate. These FRP panels are quite flexible, and easily made the pronounced bend at the outboard ends. I also laminated a ⅜-inch plywood core in the center section of the hardtop for mounting a hinged boom crutch.
While the adhesive was setting up, I screwed the laminated pieces directly onto the frames with stainless-steel, self-tapping sheet screws. After smoothing off the edges with a wood rasp, I primed and painted the top to tone down the high gloss of the panels’ stark white finish, and to add a little extra protection against the elements. Finally, I installed an awning track beneath the forward edge and had its counterpart boltrope sewn onto a Strataglass windshield so it would slide into place. Presto! I had a permanent, maintenance-free, rainproof dodger top.
Because Silverheels is an aft-cockpit ketch, her bimini top was more complex to design and fabricate. To sail the boat properly, I need ready access to the mizzen boom and sail from the cockpit. This requires some kind of opening through the bimini top. I had accomplished this in my original Sunbrella bimini with zippered “hatch flaps,” and I incorporated them into the after-section of my new hardtop as well. But to cover the two forward access cutouts, I made a pair of low-profile sliding hatches. Of course, most cruising sailboats, not having a mizzen, won’t need access hatches, thus making their hardtop bimini much simpler, quicker and easier to fabricate.
It made sense to laminate, cut and shape the bimini panels on a temporary dockside workbench instead of in place on their frames (as I had done with the dodger), and this time I fastened them to the frames with U-bolts rather than self-tapping screws. Because my boat’s cockpit is wider than a single 8-foot panel would cover, I had to use port and starboard sections, seamed in the middle, which necessitated a stainless-steel “backbone” for the center joint. There are also two smaller panels aft, shortened to leave room for Silverheels ‘ mizzenmast’s running backstays.
Laminating the panels on the broad, flat pier was quick and easy. However, fitting the bimini entailed several dry runs, each time refining the fit and features on the frames and then removing the pieces to the workbench for execution, where I also painted them and installed the “sail view” windows just prior to the final installation. Once it was all bolted down, a bead of bedding compound sealed the center seams. An awning track along the forward edge holds a zipper for a Sunbrella filler piece that connects the dodger top to the bimini top in wet weather. Still to come are a gutter for rain catchment along the bimini top’s outboard edges, and perhaps port and starboard solar panels on top. For boats that keep the spray dodger and bimini top up all the time, replacing the fabric with inexpensive, easy-to-work FRP panels is an alternative worth considering. It’s a simple, straightforward project that provides lasting benefits.
A longtime contributor to CW whose first article appeared in 1979, Tor Pinney is a writer, photographer, marine consultant and veteran cruising sailor with 150,000 nautical miles under sail. He’s also the author of the acclaimed reference book Ready for Sea! How to Outfit the Modern Cruising Sailboat. For more on Tor’s ventures, visit his website (www.tor.cc).
More: DIY , DIY Sailboat Projects , How To , refit
More How To
Best Practices for Boat-Show Shopping
Grease the Wheels of Your Boat: A Guide to Proper Lubrication
A Bowsprit Reborn: A DIY Renovation Story
Rigging Redo: Our Switch to Synthetic
Pre-Owned: 1988 Hylas 47
Understanding Wind in the West Indies
Catalina Introduces the 6 Series
At Your Service
Digital Edition
Customer Service
Privacy Policy
Terms of Use
Email Newsletters
Cruising World
Sailing World
Salt Water Sportsman
Sport Fishing
Wakeboarding
5 DIY Boat Bimini Top Ideas & Expert Tips to Master the Wave!
Welcome aboard, fellow boat enthusiasts! Are you ready to embark on a DIY adventure that will take your boat game to the next level? Well, shiver me timbers, because we’ve got just the thing for you! In this article, we’re diving headfirst into the exciting world of boat bimini tops. Whether you’re a landlubber or an experienced sailor, we’ve got expert tips and five homemade boat bimini top ideas that will make your boat the envy of all the marinas.
Before we set sail, let us introduce you to our secret weapon: tinktube’s building material. This innovative building system will make your DIY projects a breeze, providing you with sturdy, reliable materials to bring all your designs to life. But wait, there’s more! If you have questions along the way, we’ve got your back. You can book a free call with our technical expert extraordinaire, Esteban. He knows the ins and outs of building with tinktube like nobody else, and he’s more than happy to lend a helping hand.
So, whether you’re a novice or a seasoned pro, it’s time to hoist the anchor and set sail towards boat bimini top greatness. Get ready to be amazed as we unveil these fantastic ideas that will transform your boat into a floating paradise. Let’s dive in, me hearties!
But first, what is the difference between 3-bow and 4-bow bimini?
The 3-bow bimini top, my friend, is the tried and true classic. It’s the go-to option for V-hull runabouts, ski boats, performance boats, and most center consoles. This beauty provides just the right amount of shade without compromising style. It’s like having a trusty first mate by your side, always ready to shield you from the sun’s relentless glare.
But hold your sea horses, because we’re not done yet! If you happen to be the proud captain of a larger vessel, like a pontoon or a deck boat, then the 4-bow bimini top is what you need. This bad boy is built to handle the bigger boats, offering even more shade and coverage. It’s like having a giant parasol for your boat, ensuring that you and your crew can lounge in cool comfort, sipping your favourite refreshments without a worry in the world.
So, there you have it: you are now armed with the knowledge to choose the perfect shade provider for your vessel. Remember, it’s all about finding the right match for your boat, so you can sail in style and comfort!
1. Bimini top for Jon boat
This Jon boat bimini top is a true masterpiece of DIY: you’ll have the freedom to customize the size and shape to perfectly fit your Jon boat, ensuring seamless integration with your vessel.
But here’s where the magic truly happens – this bimini top is foldable! Yes, you heard it right. With a clever design and the use of the right connectors, you’ll be able to easily collapse and fold the top whenever you need some open sky above. It’s like having the best of both worlds: shade and protection when you desire it, and a clear view of the blue skies whenever you’re in the mood for an unobstructed experience!
2. DIY Jon boat bimini top
Picture this: you’re cruising on the open water, the wind in your hair, and the sun shining down on your boat. But wait, you need some shade to protect your skin from those scorching rays. That’s where a bimini top like this one comes in handy!
If you decide to build a similar project with tinktube, know that you can bend the tubes to avoid using fittings in some areas of your build!
3. Bimini top for pontoon boat
Like the first 2 examples, it can be created with high-quality steel tubes and connectors, ensuring durability and reliability. The main difference between 3-bow and 4-bow bimini boat tops is we’re adding a few more tubes and connectors to create a heavy-duty structure that can handle anything you throw its way!
With a 4-bow bimini top, you’ll have the perfect shelter from the sun’s rays. This extra bow adds even more coverage, providing ample shade for you and your fellow passengers.
What size tubing is used for bimini top?
When it comes to bimini top frames, you need tubing that can withstand the wildest waves and the fiercest winds. And that’s where tinktube’s steel tubes enter the picture. Made of galvanized steel and painted in a variety of colours, they are the perfect match for your bimini top DIY. Let’s dive into the specs, shall we?
tinktube’s steel tubes specs
Our galvanized steel pipes come in a diameter of 1-1/16″ (that’s 28 mm for you metric-minded sailors), making them sturdy enough to handle whatever the open water throws at you. And here’s the best part: they come in a convenient length of 92″.
How to cut a steel pipe
Need a custom length? No problemo! With a handy-dandy pipe cutter , you can slice through those pipes like a swashbuckling hero, adjusting them to the desired length in just a few seconds. All you’ll have to do once the pipes are cut is assemble them together with our fittings !
4. DIY boat bimini top
When building your own boat bimini top project, you have the power to customize the dimensions and style to fit your boat’s exact specifications. Once you’ve constructed the sturdy frame, it’s time to focus on the next crucial step: choosing a high-quality fabric to ensure maximum comfort and durability.
Selecting the right fabric is essential to enhance your boating experience. You’ll want a fabric that not only provides excellent shade but also withstands the elements and offers long-lasting performance. Look for fabrics that are UV-resistant, water-repellent, and have excellent tensile strength to ensure they can withstand the rigors of boating.
What is the best marine fabric for bimini top?
There’s a fabric that reigns supreme in the realm of bimini tops, and its name is vinyl. Yes, vinyl is the superhero fabric that saves the day. But not just any vinyl, mind you. We’re talking about vinyl-coated fabrics, typically made of trusty polyesters, such as the legendary Stamoid.
Why is vinyl the chosen one, you ask? Well, let us enlighten you. This magical fabric is not only waterproof but also has the superpower to divert water to the sides of the top for a perfect runoff. Say goodbye to pesky water pooling on your bimini top. With vinyl, you’ll stay dry and ready to conquer the seven seas!
But wait, there’s more! Vinyl is not just a water-repelling wizard; it’s also a durable and long-lasting companion for your bimini top. It’s like having a sturdy shipmate who can withstand the harshest of conditions, from sun rays to fierce winds and salty spray. Vinyl’s got your back, keeping your bimini top looking shipshape for years to come.
5. Custom boat bimini top
With a custom DIY boat bimini top, the possibilities are endless. As you can see, this idea has a completely different design, which makes it easier to cover a bigger part of the boat with shade. Even though it’s not foldable, it can be an interesting option for some people, as it is also simpler and easier to build!
Tailor it to fit your boat perfectly and let your creativity run wild! Your bimini top should reflect your style, enhance your boating experience, and make a statement on the water!
Raise the Bar with these Game-Changing Bimini Top Ideas
We’ve explored a world of DIY possibilities for boat owners looking to elevate their boating experience with a homemade bimini boat top. We’ve showcased the versatility and adaptability of tinktube’s building materials, which provide a strong foundation for your DIY project. The galvanized steel pipes offer not only durability but also a touch of style to your creation. And whether you opt for the classic 3-bow bimini top or the spacious 4-bow for larger boats, you now have the knowledge and inspiration to embark on this exciting DIY adventure.
We hope these ideas will help you create a custom shade and shelter solution that perfectly suits your needs! By building your own bimini top, you not only save money but also gain a sense of accomplishment and customization. Imagine the satisfaction of taking your boat out on the water, knowing that the shade and comfort above are products of your own ingenuity and craftsmanship…!
Arbor made by Ian
Ian built an arbor for his frontyard path.
Metal or Wood: The Ultimate Showdown of Materials for DIY Railings
DIY Portable Duck Blinds: Quacking Your Way to Hunting
DIY Gate Plans: Fence Gate for Gardens and Backyards
Cover frame by Thomas
Garden trellis by Destin
About the author, éloïse sirois, leave a comment cancel reply.
Enjoy total coverage and customization with DIY bimini and dodger kits from Sailrite. Quality marine grade fabric and hardware will shield you from the sun, rain and wind so you can relax on your boat in style. With dozens of fabric colors to choose from, you'll be the envy of the marina!
Grab Rails & Struts
Webbing Straps
Stay in the loop never miss sale announcements, how-to blogs, new product launches, helpful tutorials and more.
Types of Sailboats
Parts of a Sailboat
Cruising Boats
Small Sailboats
Design Basics
Sailboats under 30'
Sailboats 30'-35
Sailboats 35'-40'
Sailboats 40'-45'
Sailboats 45'-50'
Sailboats 50'-55'
Sailboats over 55'
Masts & Spars
Knots, Bends & Hitches
The 12v Energy Equation
Electronics & Instrumentation
Build Your Own Boat
Buying a Used Boat
Choosing Accessories
Living on a Boat
Cruising Offshore
Sailing in the Caribbean
Anchoring Skills
Sailing Authors & Their Writings
Mary's Journal
Nautical Terms
Cruising Sailboats for Sale
List your Boat for Sale Here!
Used Sailing Equipment for Sale
Sell Your Unwanted Gear
Sailing eBooks: Download them here!
Your Sailboats
Your Sailing Stories
Your Fishing Stories
Advertising
What's New?
Chartering a Sailboat
Boat Biminis
Some Thoughts on Boat Biminis
In sunny climes, sail boat biminis are essential to provide shade to the cockpit, thus preventing the occupants from getting too crispy. In their simplest form, biminis are made up as a canvas canopy supported by a folding tubular stainless steel frame, with the whole shebang held in place by adjustable webbing straps fore and aft.
When the boat is heeling, and the sun's on the windward side, sidescreen extensions hooked to the guardrails will return shade to the cockpit.
But few sailboat cockpits are designed with future addition of boat biminis in mind, the ergonomics associated with winch and helm positions taking priority.
Sail boat biminis can be most awkward to retro-fit, so if it is to work well a lot of thought will need to go into its design. For example...
Sail Boat Biminis as an Extension to the Sprayhood?
Most UK sailboats sport a wide sprayhood for fairly obvious reasons. A relatively simple but effective boat bimini can be fashioned by attaching the forward edge of a suitably shaped piece of canvas to it. The after edge, stiffened by a batten, can be supported by the backstay if the mainsheet is forward of the cockpit, with the corners tensioned by webbing straps clipped to the coaming.
Otherwise boat biminis must be supported by a frame attached to the cockpit coaming such that it is cleared by the mainsheet. This type of bimini can often be developed by the addition of zip-on or roll-down back and sides, to fully enclose the cockpit when in harbour.
The downside of this approach is that it will be necessary that the windows in the sprayhood can be zipped out to provide some airflow through the cockpit. The zips will be an area of weakness, and will eventually leak.
Incidentally, our American friends call our sprayhood a dodger, and what we Brits call cockpit dodgers, weather-cloths.
Freestanding or Folding Boat Biminis?
A fixed version of a boat bimini can be designed to incorporate a boom gallows, support solar panels and provide extra handholds in the cockpit. But unless the cover is easily removable, it's also there when you don't want it, such as in strong winds. More importantly, if the bimini impedes access to and from the cockpit at all, it is best if it can be removed during the hours of darkness.
On larger yachts, boat biminis can become quite a substantial structure, such that it would be a handful for the crew to lower it at sea. This problem is overcome by making one section of the frame fixed, usually the aft section, so that the remaining frames can fold back to it. This can eliminate some of the difficulties referred to below, but creates additional windage and weight aloft that could be reduced by folding the bimini down flat.
Should Boat Biminis Fold Forward or Aft?
The key considerations here are
the location of the bimini mounting point in relation to the sheet winches, and
the position of the mainsheet traveller.
Generally, if it's mounted outboard of the winches it will need to fold aft, astern of the winches, otherwise it will lie on the headsail sheets. If the mainsheet traveller is positioned at the after end of the cockpit, the folded bimini must not foul it, and the mainsheet must be clear of any part of the raised bimini at any point of sail. The position of any runners or checkstays when set up must also be taken into account.
If the boat bimini mounting point is inboard of the winches, then the limitations caused by the headsail sheet leads will not apply. But the bimini will be narrower and the shaded area below smaller. If it folds forward it must not fall across the companionway, or foul a mainsheet traveller mounted at the forward end of the cockpit.
Height, Length and Width?
The maximum height of the bimini is governed by the clearance under the boom when the mainsail is sheeted in hard. But it should not be any higher than necessary or shade when heeled may be reduced. Ideally about 100mm of clearance above head height should be available when sitting out on the coaming, or when standing in the cockpit well.
It should be long enough to protect the helmsman and cover as much of the cockpit as possible, but the longer it is the more steel hoops it will need to support it.
The maximum width will be determined by the position of the mounting points either inboard or outboard of the sheet winches.
Mounting Point, and Fore And Aft Support?
The ideal fore and aft mounting position will be largely dependant on the previous considerations concerning folded position and height, but if you were not yet aware that compromise is a major part of yacht design, you will now become so.
Because, having selected the preferred mounting point;
the winch handle will foul the support tubing;
there will be a light fitting in the aft cabin directly below the mounting point bolts;
access to the underside of the mounting point will be impossible in the cockpit locker;
if the height is right it won't fold down in the right place;
if it folds down in the right place it won't go under the boom;
it folds back against the backstay;
it's smack in the middle of your favourite sitting-out position.
Some of these problems can be overcome by using sliding fittings at the hinge points and by mounting the whole shebang on cars which slide along lengths of track either side of the cockpit.
But there's no short answer. Just make up a pattern from timber battens or light tubing and play around with the geometry until you get it as "right" as you can.
Adjustable webbing straps attached to each corner will secure the bimini in position but may impair access in and out of the cockpit. Alternatively if space permits, short stainless support struts pinned to the coaming can be used. The pins will be of the quick-release type which will enable the bimini to fold in the same way.
Fabrication of Boat Biminis
Ideally the frame should be fabricated in 25mm stainless steel with stainless steel fittings throughout. Aluminium tubing can be used and is cheaper in the short term, but it is hardly strong enough, will corrode, and any stainless fittings used with it will seize solid after a time.
The canopy is best made from UV-resistant polyester or acrylic canvas, sewn up with UV-resistant thread.
If you possess the necessary skills and equipment to do the welding, tube cutting and bending yourself, then all the other stainless steel fittings can be purchased seperately. Otherwise, I would recommend that you get a stainless steel fabricator to bend the tubes and weld in the end fittings. He will be very pleased to work to your design, as if it doesn't fit it won't be his fault.
The cover is best made from uv resistant polyester or acrylic fabric, sewn up with uv resistant thread. Some yachtsmen favour white fabric, as it reflects the heat. However it can still let the sun's glare through. For this reason we prefer a dark canvas, relying on a through flow of air to dissipate any heat.
Whilst your sailmaker will be happy to make the cover for your bimini, you can save a few pounds by making it yourself. You will need a robust sewing machine though, ideally one with a walking foot and a zigzag stitch facility.
Incidentally, if you do go down the make-it-yourself route, it's worth thinking about incorporating a rain-catcher in your boat biminis.
It was in designing Alacazam's boat bimini that the foregoing issues became apparent.
Only after the best part of a day messing about in the cockpit with timber battens and bits of string did I feel confident to commit to stainless steel tubing.
But now we have a simple, effective, aft folding boat bimini with roll-up sidescreens that takes only a few minutes to put up and take down, and which now ranks alongside the Aries Self Steering Gear as one of the indispensable items of cruising equipment.
Finally, if you are thinking of making a bimini for your boat, you'll find this bimini installation video very useful...
You might like to take a look at...
The bosuns chair and other means of going aloft.
Most cruising sailboats stow a bosuns chair for getting aloft, but there are other ways of getting up there. Take a look at traditional and modern mast-climbing alternatives here
How Do Windvane Self Steering Gears Keep Sailboats On Course?
Ever watched a windvane self steering gear working away at the stern of a sailboat and wondered just how it keeps it on course? Well, here's how it does it
Are Inflatable Yacht Tenders the Best Choice for Cruising Sailors?
Whilst inflatable yacht tenders are the most popular, this review of the available options will ensure you find the one that suits you and your boat the best
Will A Sailboat Wind Generator Transform Your Battery Charging?
On a breezy windward passage, a sailboat wind generator can provide most, if not all of your power requirements. So why do many sailors dismiss them and turn to other forms of green energy?
Get LED Boat Lights and Forget About Battery Drain!
LED Boat Lights are definitely the way to go for both cabin lighting and navigation lights - around 90% savings in power consumption and 50,000 hours before they need replacing!
Discover how building a custom bimini top can save you money, provide customization, and develop your skills as a DIY enthusiast, while enhancing your boating experience with shade and protection from the elements.
Building a Custom Bimini Top
A bimini top is an essential addition to any boat, providing much-needed shade and protection from the elements while you’re out on the water. In this comprehensive guide, we’ll walk you through the process of building a custom bimini top for your boat, from selecting the right materials to installing the finished product. Whether you’re an experienced DIYer or a complete novice, this guide will provide you with the knowledge and confidence to tackle this rewarding project.
Table of Contents
Why build a custom bimini top, choosing the right materials, measuring and planning your bimini top, constructing the frame, sewing the fabric, assembling and installing your bimini top, maintenance and care.
There are several reasons why you might choose to build a custom bimini top for your boat:
Cost savings : Building your own bimini top can be significantly cheaper than purchasing a pre-made one, especially if you already have some of the necessary tools and materials on hand.
Customization : By building your own bimini top, you can tailor it to your specific needs and preferences, ensuring that it’s the perfect fit for your boat and your lifestyle.
Skill development : Tackling a DIY project like this is a great way to learn new skills and gain confidence in your abilities as a boat owner and DIY enthusiast.
Before you begin building your custom bimini top, you’ll need to gather the necessary materials. Here’s a list of what you’ll need:
Marine-grade fabric : This is the most important component of your bimini top, as it will provide the shade and protection you need. Look for a high-quality, UV-resistant fabric that’s designed for marine use, such as Sunbrella or Top Gun.
Stainless steel tubing : This will form the frame of your bimini top. Choose a tubing size that’s appropriate for your boat and the size of the bimini top you’re building (typically 7/8” or 1” diameter).
Stainless steel fittings : You’ll need a variety of fittings to connect the tubing and secure the frame to your boat, including jaw slides, eye ends, and deck hinges.
Thread : Choose a UV-resistant, marine-grade thread for sewing the fabric.
Zippers and fasteners : You’ll need heavy-duty zippers and fasteners to secure the fabric to the frame and your boat.
Bimini straps : These adjustable straps will help to support the bimini top when it’s deployed.
Before you start cutting and sewing, you’ll need to measure your boat and plan the dimensions of your bimini top. Here are some steps to follow:
Determine the desired width : Measure the width of your boat at the point where you want the bimini top to be mounted. This will be the width of your bimini top.
Determine the desired length : Decide how much coverage you want from your bimini top, and measure the length accordingly. Keep in mind that a longer bimini top will provide more shade, but may also be more difficult to handle and store.
Determine the desired height : Measure the distance from the mounting point to the desired height of the bimini top. This will be the height of your frame.
Plan the frame : Sketch out a rough plan of your bimini top frame, including the dimensions and the locations of the fittings. This will help you visualize the finished product and ensure that you have all the necessary materials.
Once you’ve gathered your materials and planned your bimini top, it’s time to start building the frame. Follow these steps:
Cut the tubing : Using a tubing cutter or hacksaw, cut the stainless steel tubing to the appropriate lengths for your frame. Be sure to file down any rough edges.
Assemble the frame : Connect the tubing pieces using the stainless steel fittings, following your frame plan. You may need to use a rubber mallet to gently tap the fittings into place.
Test fit the frame : Before you proceed with sewing the fabric, it’s a good idea to test fit the frame on your boat. This will allow you to make any necessary adjustments and ensure that the frame is properly aligned.
With the frame constructed, it’s time to sew the fabric for your bimini top. Here’s how:
Create a pattern : Lay the fabric out on a large, flat surface and use your frame measurements to create a pattern for the bimini top. Be sure to add extra fabric for seam allowances and hems.
Cut the fabric : Using sharp fabric scissors, carefully cut out the pieces of your bimini top according to the pattern.
Sew the seams : Using a heavy-duty sewing machine and marine-grade thread, sew the fabric pieces together, following the pattern. Be sure to reinforce any stress points with extra stitching.
Add zippers and fasteners : Sew heavy-duty zippers and fasteners to the appropriate locations on the fabric, ensuring that they align with the frame and your boat’s mounting points.
Hem the edges : Fold the edges of the fabric under and sew a hem to create a clean, finished look.
With the frame and fabric complete, it’s time to assemble and install your custom bimini top:
Attach the fabric to the frame : Slide the fabric over the frame, ensuring that it’s properly aligned with the fittings and mounting points. Use the zippers and fasteners to secure the fabric in place.
Install the frame on your boat : Attach the frame to your boat using the deck hinges and other mounting hardware. Be sure to follow any manufacturer’s instructions for proper installation.
Adjust the bimini straps : Attach the bimini straps to the frame and adjust them as needed to provide the proper support and tension for your bimini top.
To keep your custom bimini top looking and performing its best, be sure to follow these maintenance and care tips:
Clean the fabric regularly : Use a mild soap and water solution to gently clean the fabric, removing any dirt, salt, or other debris. Rinse thoroughly and allow the fabric to air dry.
Inspect the frame and fittings : Regularly check the frame and fittings for signs of wear or damage, and replace any parts as needed.
Store the bimini top properly : When not in use, store your bimini top in a protective cover or boot to keep it clean and protected from the elements.
Building a custom bimini top for your boat is a rewarding and cost-effective DIY project that can greatly enhance your boating experience. By following this comprehensive guide, you’ll be well on your way to enjoying the shade and protection of your very own custom bimini top. Happy sailing!
The $tingy Sailor
Diy trailerable sailboat restoration and improvement without throwing your budget overboard.
Upgrade to a Bimini Top on a Budget
The first mate and I live at around 48 degrees north latitude, which means that we don’t get a lot of hot weather. We have four distinct seasons and enjoy them all. It will get to around 100 degrees for a couple of weeks in August, but that’s as hot as it gets. The rest of the summer is in the 80’s and 90’s.
Mrs. $tingy is susceptible to heat exhaustion. She had a close call once while we were anchored out one summer after a full day of cruising on a clear, hot day on Lake Coeur d’Alene in Idaho. We took all of the appropriate precautions. She tried to stay in the sail shade most of the time, drank plenty of fluids, took breaks below deck, etc. but it only delayed the inevitable.
All that to say that consistent shade in the cockpit is more than just a luxury for her, it could mean the difference between a great weekend of cruising and one cut short by making a beeline for home or worse, the emergency room. I hadn’t seriously considered adding a bimini to Summer Dance until after that episode.
Before I go any farther, a bit of legal housekeeping. This post contains affiliate links. That means I receive a small commission if you make a purchase using these links. Those commissions help to pay for the costs associated with running this site so that it stays free for you to enjoy. For a complete explanation of why I’m telling you this and how you can support this blog without paying more, please read my full disclosure .
The winter after her close call, I installed an inexpensive 3 bow bimini with these features:
The hardest part of the decision was figuring out what size to buy for the most usage and stowing options once it was mounted. I settled on:
6′ long covers most of the cockpit but leaves room at the stern for the main sheet, backstay, and a good view of the mainsail
73″-78″ wide mounts easily on the deck outside the coamings. You can also install it on top of the coamings but you will need to shorten the top to clear the boom.
44″ high, which is 8″ higher than most biminis sold for the C-22. I wound up shortening the frame by 5″ to not interfere with the boom but we can still stand up under the cover.
I purchased the top in gray to match the non-skid surfaces on our deck. Later the next summer, I sewed the blue Sunbrella cover that you see in the picture above and a boot to match the rest of our canvas.
We can slide it to the rear and fold it down onto its support poles when at a dock or at anchor and board or walk around in the cockpit without it being in the way.
To get it completely out of the way without detaching it, we can slide it all the way forward, fold it down, and it will pivot forward onto the cabin roof in the space between the pop top and the mast.
For front supports, I kept the nylon straps but replaced the double-D type buckles with cam buckles so that I could quickly and easily lengthen or shorten the straps depending on which set of jaw slides the bimini is attached to. I mounted the included eye straps to the existing screws for the pop top dogs, so no drilling was needed.
Shortening the frame was fairly easy:
Detach the vertical tubes from the frame so that you can work on them.
Drill out the aluminum rivets that hold the bottom hinge fittings in the ends of the tubes and remove the fittings.
Cut the tubing to length with a metal cutoff blade in a miter saw. Use a hacksaw if that’s all you have and file the end flat and smooth.
Drill new holes in the tube and reattach the hinge fittings with new rivets or sheet metal screws.
You might also need to shorten the rear support poles in the same way to fit your jaw slide locations.
Mrs. $tingy loves the bimini and when she’s happy, I’m happy and we can keep cruising.
Would you like to be notified when I publish more posts like this? Enter your email address below to follow this blog and receive notifications of new posts by email. You will also receive occasional newsletters with exclusive info and deals only for followers and the password to the Downloads page. It’s free and you can unsubscribe at any time but almost nobody does!
Subscribe to Blog via Email
Enter your email address to subscribe to this blog and receive notifications of new posts by email.
Email Address:
Share this:
25 thoughts on “ upgrade to a bimini top on a budget ”.
Hi could you offer some suggestions on sourcing the 36 in tracks and the hindged jaw slides? West marine keeps sending me 30 in units and insisting 36 is not available. Enjoy your post we have a 1985 22. And have been doing almost the same projects as you. Thanks for your efforts. Jeff
I purchased the Carver 3′ Slide Track Kit 1Pr/Pk – 62001 from a local marine discount store but following is a link on Amazon for the same part:
But 30″ tracks would probably also work. In their aft-most position, I usually have about 6″ of unused track. For it to work like I described, the important thing is that the bimini can slide forward enough to lay down between the mast and the pop top. With the bimini frame attached, position your tracks with their forward ends in that location and then check that, when the bimini is raised in its aft-most position, the bimini is as far back as you want (but not interfering with the backstay) and the frame doesn’t interfere with the winches.
The Stainless boat Bimini top hinged jaw slide 1″ 25 mm I purchased from Discount Marine Store on Amazon. They had the best price that I could find at the time. Here’s a link:
Note: The preceding are affiliate links. If you use these links to make a purchase on Amazon, I will receive a small commission that I will use toward the cost of administering this blog. The cost you pay to Amazon is the same but I’d appreciate your support if you enjoy this blog. If you prefer to not use these links, just go to the Amazon home page and search for the item names shown above.
Good luck on your projects and hope to see you again here!
Out of curiosity, how/where did you shorten the frame by inches? Seriously considering this but I am nervous about cutting the frame in the wrong place.
I added a list to the end of the post with the steps I used to shorten the frame from the bottom. I hope they’re clear enough to calm your nerves. If not, feel free to ask more questions. It’s pretty easy, really. Just be sure the amount that you want to shorten it is correct before you cut it down because you can’t easily lengthen it again. I actually cut down the main bow tubes by 3″ at first and reassembled the frame to test whether that was short enough. Since the frame is angled, it resulted in less than 3″ reduction in height. The boom rubbed the top of the bimini a little so I cut it down again by 2″ more. The only complications that I encountered by doing this was: 1) It lowered the front bow to where it was sometimes in the way of working the winches. I fixed that in the same way by raising it’s hings fittings back up the frame a couple inches and 2) That move made the three bows not line up on top of each other as closely when the bimini is folded. The boot is tighter to put on but it’s not a showstopper. If I want to resolve that, I can just shorten the front bow accordingly.
Thanks for your comments. I hope to see you around more in the future!
Very well administered site with great info. I appreciate your attention to detail and cost savings.
Great job detailing all your work, Richie
Thank you for the advice. I also live in Cd’A my wife and I are in the process of buying a catilana 22. Its a little warm early this year as you know I think a Bimini will keep my girls happy. Hope to see ya out there I’m sure we will be chilling off arrow point watching one of our great sunsets.
We’re cruising around the north end of Lake Pend Oreille this week and will be down in the south end next week. We also visit Lake Cd’A a couple times each summer. If you ever see us on the water, stop by and say Hi!
Pingback: Bimini | 'Mia Noi'
$tingysailor,
Does that track screw right it to the side decking? It doesn’t look like it would be easy to get to the underside for backing hardware.
I never made any “new” holes in my boat, well… not that 8 know of anyway. 😉
let me know.
Yep, no fasteners on the underside necessary. Just put a little butyl tape around the screws to seal the deck penetrations.
Your blog is a wealth of Catalina DIY information, with a great emphasis on cost reduction! You’re most appreciated!
My ’77 Catalina 22 never had a stern pulpit installed. I intend to purchase the bimini top from the link you provided, along with the tracks. Will the rear support poles be long enough to surface mount along the stern, or close to on each side? I wasn’t sure if you had to shorten your rears quite a bit to mount to your pulpit, or if they arrived that way.
Also, any recommendations on where to buy the tethered quick-connects?
Keep up the great work!
They aren’t long enough to reach the transom but they can definitely be attached to the tops of the coamings farther forward. Here’s a link to some quick pins with lanyards: http://amzn.to/2l5YhrJ .
Enjoy your new bimini! $tingy
My boat came with a really nice canvas from a bimini, but no frame. In addition there are tracks run on the coaming already. When I measured from the coaming to the boom I got about 34″.
The dimensions of the canvas are 70″ wide and 54″ long. Here is a pic of the canvas sitting on 12″ tiles:
https://goo.gl/photos/wpYn8t84vz2ygHK9A
I found a frame that is only 32″, but it is 60″ long (6 inches longer):
A little geometry tells me that if I reduce the length of the frame to 54″ inches by changing the angle of the outer two poles without changing the length of the poles, the height will increase to 34.6″.
What do you think of using this frame with my existing canvas? Will the frame work with my canvas? Will I probably end up shortening the poles like you suggested?
BTW, the boat I just bought (an O’Day 20) is called “Just Enough,” perfect for this blog.
That frame will probably work, Dave. The canvas should slide right on and will limit the length of the bimini. Then you might need to shorten the bottom of the main bow a couple inches to clear the boom. Mock it up on your boat first without cutting and see. You might discover that you don’t need to cut at all if you tilt the bimini slightly forward or backward so that the middle bow isn’t the high point. The resulting headroom at the front or rear might work better for you as well.
Very nice. Thanks!
What do you think about using this sliding hinged jaw slide? That would only require 2 instead of 4.
I haven’t seen those before but they should work fine. They might limit how far forward you can slide the bimini due to the forward pushpit stanchions but not enough to make a big difference. I say try ’em and let us know how they work out.
Thanks, $tingy
Dig this blog! Where did you find the lobster claw type clips?
Sliding hinges will work fine. I chose not to use them because I wanted to put a pair forward of the pushpit stanchions and sliding hinges would work there. The bimini strap clips came with the bimini but you can purchase them separately from several places.
Thanks, it was interesting to read. I would like to read a similar article, but with updates to the current time, if possible.
What parts did you get for the rear support poles?
The tubes came with the bimini except for the rail clamps, which I bought separately.
Could the tracks be mounted a little farther outboard so a 79”-84” bimini could be used? Probably a silly question but I’d like to make sure before I make the purchase. Also, is there any reason why the 73”-78” size would be preferable to the larger size?
Yes, but there would be little foot room to walk along the side decks. That’s why I place mine as far inboard as possible. Depending on where you placed them fore and aft, stanchion bases might dictate that you place them farther aft than you would otherwise want to, and if you place them as far outboard as possible, they could interfere with the genoa car. A 6″ wider bimini isn’t going to give you appreciably more shelter.
Leave a comment Cancel reply
This site uses Akismet to reduce spam. Learn how your comment data is processed .
Already have a WordPress.com account? Log in now.
Subscribe Subscribed
Copy shortlink
Report this content
View post in Reader
Manage subscriptions
Collapse this bar
ACTIVE STORM TRACKER Hurricane and Tropical Storm Information Learn more
Service Locator
Angler Endorsement
Boat Towing Coverage
Mechanical Breakdown
Insurance Requirements in Mexico
Agreed Hull Value
Actual Cash Value
Liability Only
Insurance Payment Options
Claims Information
Towing Service Agreement
Membership Plans
Boat Show Tickets
BoatUS Boats For Sale
Membership Payment Options
Consumer Affairs
Boat Documentation Requirements
Installation Instructions
Shipping & Handling Information
Contact Boat Lettering
End User Agreement
Frequently Asked Questions
Vessel Documentation
BoatUS Foundation
Government Affairs
Powercruisers
Buying & Selling Advice
Maintenance
Tow Vehicles
Make & Create
Makeovers & Refitting
Accessories
Electronics
Skills, Tips, Tools
Spring Preparation
Winterization
Boaters’ Rights
Environment & Clean Water
Boat Safety
Navigational Hazards
Personal Safety
Batteries & Onboard Power
Motors, Engines, Propulsion
Books & Movies
Cockpit Confessions
Communication & Etiquette
Contests & Sweepstakes
Colleges & Tech Schools
Food, Drink, Entertainment
New To Boating
Travel & Destinations
Watersports
Anchors & Anchoring
Boat Handling
← How-To DIY
Installing A Bimini
Advertisement
How to select and install a bimini that functions like a convertible top for your boat.
The fore and aft supports can be either additional poles, or webbing straps depending on preference. Straps make it easier to collapse the top into the down position, but aren't as rigid if you are going to be adding side curtains in the future.
What You'll Need
Tape measure
Drill and bits
Hardware and fasteners
Countersink bit
Screwdriver
Box wrenches
Bimini tops offer boaters the flexibility of a convertible, combining shade and sun protection when we want it with the option of putting the top down when we don't. When fitted with side curtains, bimini top frames can also be used to create portable "cabins" to cut wind and water from the sides — yet be easily stowed when it's time to soak up some sun, catch a cooling breeze, duck under a low bridge, or tow the boat on a trailer.
The versatile tops can be made in practically any size to fit a variety of applications, and the supporting frames, or bows, can be mounted just about anywhere and are designed to fold out of the way. Basic bimini tops use support bows of aluminum or stainless steel with pivoting hinges that are anchored at the gunwales and held tautly in place by straps of webbing or rigid metal beams snapped to fittings atop the gunwales fore and aft of the pivot point. Here are the materials needed and steps to take to select and install a basic bimini top:
1. Determine Top Size
Measure the beam amidships where the bows will be mounted to the gunwale, which will determine the top's width, and note the height and length measurements you require, based on how much deck or cockpit you want covered and how much headroom you need. Keep in mind that the height, as well as width and length, and how much rounding down of the top you want will determine how much shade the top will provide. Stock or semi-custom, special-ordered bimini tops generally range from four to eight feet in length, with 6-foot-long tops being standard. Bimini bows can flex as much as three inches in or out where they attach to the gunwale, so there is a six-inch range that can be accommodated by generic tops to allow them to match most any trailerable boat's beam. These tops cost significantly less than custom biminis and come in a variety of colors.
2. Determine Top Position
Most boaters choose to mount their bimini so that they can stand at the helm without ducking.
Hold the deployed top in place and determine where the pivot point should be secured along the gunwale. It's important that those hinge points are exactly opposite and parallel to each other to keep the top from binding when folded. If there's no space along the top of the gunwale, you'll need hardware for side-mounting the deck hinges. When deciding where to mount the hardware, make sure the folded top will stow where it is out of the way. Check where the folded top will drop when it is in the folded, stored position. Most boaters stow their bimini tops in a storage cover, called a boot, across the aft end of the cockpit, but some frames are designed to fold forward to rest along the top of the windshield or across the bow. Make sure that there is enough distance in front of and behind the deployed top's support bows to mount eye straps or braces for attaching the angled straps that help secure the bows.
3. Mount The Bow Hinges
When collapsed, make sure the top rests in a convenient position that doesn't interfere with passengers moving about.
Put masking tape on the mounting surfaces and use the hinge hardware to mark the places for drilling holes. For the installation to be strong enough, you need to through-bolt the mounting bolts and secure them with nuts on the underside. Make sure the underside will be accessible and clear of wires and hoses. Drill and chamfer the holes with a countersink to reduce gelcoat cracking and remove the masking tape. Apply marine-grade silicone sealant or butyl tape to the mounting surface and secure each deck hinge into place using high-grade stainless nuts and bolts.
4. Install The Strap Eyes
With the main bow secured to the deck hinges, deploy the top, and extend the fore and aft web straps to create an M-shape on each side. Doing so will show you where to mount the strap eyes, which should be mounted in the same plane fore and aft as the bows and directly across from each other along the gunwale port to starboard. Put tape down where the eyes will be secured, which should be oriented parallel to the gunwale. Mark, drill, chamfer, bed, and mount each eye using self-tapping high-grade stainless screws at the same position on each side of the boat. Attach the strap snap hooks to the strap eyes and use the buckles to adjust the top so that it is taut and the cover is parallel to the deck.
5. Test The Top
With fixed poles fore and aft, it's crucial to get all these highlighted measurements correct. Using straps in the fore and aft positions offers greater flexibility.
With the top deployed, operate the boat from low to mid-range speed, checking the frame and cover to make sure they remain secure. Adjust or tighten the straps to reduce flapping or shaking and to maintain headroom fore and aft. Note, most manufacturers recommend operating at speeds no more than 30 mph with the bimini top deployed. Stop the boat, stow the top, and perform the same test, making sure it remains in its stored position when the boat is underway. When the top's fit and security are confirmed in both the stowed and deployed positions, it's time to start enjoying one of the most practical accessories you can add to the family boat.
Secure Options
Tracks for securing the bows' pivot hinges are available for mounting atop or along the gunwale to allow the top to slide fore or aft for deploying, or for out-of-the-way stowing. You can even set two anchor positions for the top using a track and two corresponding sets of four strap eyes for each.
Aft braces are popular alternatives to web straps to support the bimini's main bow, allowing the forward web straps to keep the top taut. The rigid braces, usually made of aluminum or stainless steel and often with a telescoping feature, allow the top to be folded back in a semi-elevated position to keep aft cockpit space clear, and can be detached or collapsed to allow the top to be fully dropped to gunwale level for stowing or towing.
Quick-release pins, rather than bolts, are available for easy removal or positioning of the bow hardware and rigid aft braces to the deck mounts.
Protective zippered boot covers are offered to match each bimini top in color and size, and are recommended to protect the fabric when stowing or storing. These are a must when trailering to keep it from blowing open at highway speeds.
Related Articles
The truth about ceramic coatings for boats.
Our editor investigates the marketing claims of consumer-grade ceramic coatings.
Fine-Tune Your Side Scan Fishfinder
Take your side-scanning fishfinder off auto mode, and you’ll be spotting your prey from afar in no time
DIY Boat Foam Decking
Closed-cell foam flooring helps make boating more comfortable. Here’s how to install it on your vessel
Click to explore related articles
Dan Armitage
Contributing Editor, BoatUS Magazine
A full-time travel and outdoors writer based in Ohio, Dan is in his 20th season hosting the popular syndicated radio show Buckeye Sportsman. He gets around on a pontoon boat and an Aquasport center-console, which he uses for all his DIY editorial projects and fishing features. A USCG Captain (Master 50-ton), he’s a popular speaker at boat and sport shows.
BoatUS Magazine Is A Benefit Of BoatUS Membership
Membership Benefits Include:
Subscription to the print version of BoatUS Magazine
4% back on purchases from West Marine stores or online at WestMarine.com
Discounts on fuel, transient slips, repairs and more at over 1,200 businesses
Deals on cruises, charters, car rentals, hotel stays and more…
All for only $25/year!
We use cookies to enhance your visit to our website and to improve your experience. By continuing to use our website, you’re agreeing to our cookie policy.
Forums New posts Unanswered threads Register Top Posts Email
What's new New posts New Posts (legacy) Latest activity New media
Media New media New comments
Boat Info Downloads Weekly Quiz Topic FAQ 10000boatnames.com
Classifieds Sell Your Boat Used Gear for Sale
Parts General Marine Parts Hunter Beneteau Catalina MacGregor Oday
Help Terms of Use Monday Mail Subscribe Monday Mail Unsubscribe
diy hard top bimini
Thread starter b crites
Start date Apr 11, 2019
Forums for All Owners
Ask All Sailors
Anyone installed a hard top bimini? Diy material used or ideas?
On a 34’ boat that would be equivalent to a small aircraft stabilizer. It is nice to be able to reduce windage on a boat.
@Gunni He is most likely sailing Guntersville Lake in which case you just go tie off when the weather gets bad.
I thought about one before I went with the traditional canvas. I had looked at greenhouse roof material and even prepainted metal roofing. Places like Home Depot carry a thin plastic material for shower walls. I just decided I wasn't skilled enough to make it turn out as I envisioned.
Michael Davis
Our friend with a Bene 34 did a hard Dodger, male mold, carbon fibre lay-up, vacuum bagged etc. He wanted it strong enough to walk on. That seems a lot of work for a bit of shade!
b crites said: Anyone installed a hard top bimini? Diy material used or ideas? Click to expand
I've had both, and hard top is nicer and cooler. But building a light, strong molded hard top is not simple, and many turn out ugly. Of course, many canvas dodgers are ugly too! Stick with light colors (cooler and looks smaller); I find navy biminis hot in the sun. There is really no reason it cannot be removable. Most are bolt-on constructions, and removing a small hard top is often easier than removing a canvas dodger. But you won't.
Project_Mayhem
You could call around to marinas to see if they have any cabin tops from boats they're about to scrap
Will Gilmore
The only problem with a hard top bimini is it is harder to stow, so once it's up... no more windage than a soft top. B crites, it sounds like you are on a freshwater lake. How wet is your sailing? You can probably get away with an inexpensive sheet of 1/4" luan from a local box store. Cut to size to include a light frame rabbetted around the exposed edges made of something like spruce or cedar (also available at the box store). Use a strong waterproof glue, Gorilla glue, Titebond 3, epoxy. Finish the whole top with epoxy base-coat, then paint or varnish. Erect your superstructure and bolt the top down with ss carriage bolts bedded with a rubber gasket or butyl tape. Not complicated. Design it with camber to shed water and improve strength. -Will (Dragonfly)
I've been thinking about it and looking around for years. I've seen some really well-done dodgers, but I haven't gotten the name of the plastic sheeting used. My real problem here is how to attach the cloth that holds the Eisenglass windows onto the top. For a hard top, it has occurred to me that it is quite possible (in our case) a full-size truck fiberglass Tonneau Cover would be just about perfect, especially considering I'd add a clear/tinted section down the middle, so I can see the sails, and maybe a hatch. They are well made, low maintenance, lightweight and come in lotsa purty colors. And dirt cheap when you compare them to the cost of having a cloth bimini made! One for a smaller pickup could do for a smaller boat?
gettinthere
PVC sheets are light weight and easily curved to fit in place over the bimini bows. Taco Metal makes a nice trim called Flex Trim that can be fitted to the edges. There is also Flex-A-Rail at sailrite that is a track you slide piping into for your windows, sort of like the luff track for your genoa. As soon as my bimini top gives out I'm on this.
gettinthere said: PVC sheets are light weight and easily curved to fit in place over the bimini bows. Taco Metal makes a nice trim called Flex Trim that can be fitted to the edges. There is also Flex-A-Rail at sailrite that is a track you slide piping into for your windows, sort of like the luff track for your genoa. As soon as my bimini top gives out I'm on this. Click to expand
sailnoproblem
capta said: I wish it was that easy. The people I've talked to who have used the track you slide piping into, say it won't do the job on a cruising boat. It gets weak and bends. Not strong enough to take green water on the dodger windows. Click to expand
sailnoproblem said: I've never had that happen to any of the hard tops that I built over the years. I used it on Sportfishermen and performance center console fishing boats. Some of those boats were in some real nasty seas. Maybe I am thinking of a different product. Click to expand
I've seen blogs were people have used fiberglass sheets for shower walls and corrugated plastic sign board stock as ideas...
This site uses cookies to help personalise content, tailor your experience and to keep you logged in if you register. By continuing to use this site, you are consenting to our use of cookies. Accept Learn more…
2024 BOAT BUYERS GUIDE
Email Newsletters
Boat of the Year
2024 Freshwater Boat and Gear Buyers Guide
2024 Boat Buyers Guide
2024 Water Sports Boat Buyers Guide
2024 Pontoon Boat Buyers Guide
Cruising Boats
Pontoon Boats
Fishing Boats
Personal Watercraft
Water Sports
Boat Walkthroughs
What To Look For
Watersports Favorites Spring 2022
Boating Lab
Boating Safety
Ultimate Boating Giveaway
Installing A Bimini Top
By Jim Hendricks
Updated: April 19, 2013
A Bimini top is a great way of creating shade, while also offering the versatility to fold it back to catch some rays, trailer home or store your boat. While Bimini tops can be mounted in a variety of ways, the simplest tops are anchored at the gunwales and utilize adjustable web straps forward and aft to keep the canvas taut and the structure secure. The most affordable models from brands such as Carver ( carvercovers.com ) and Taylor Made ( taylormadeproducts.com ) have aluminum bows with reinforced nylon fittings, while more expensive versions feature stainless-steel bows and fittings, offering greater durability in salt water. In either case, make sure the top has at least three bows for proper support.
Getting Started Skill Level: 2/5 Time to Complete: Under 2 hours
Tools and Supplies *6-foot-long Bimini Top *Eye straps (4) with fasteners *BoatLife LifeCalk polysulfide sealant *T-square (to square the deck hinges) *Tape measure *Chalk line (to snap a line between the two deck hinges) *Power drill and bits *Countersink bit *Screwdriver set *Box-wrench set *Cleanup rags (to wipe off excess sealant)
1. Select the Size The width of the top is determined by the measurement between the points where the two deck hinges will attach, but the length and height can be varied to suit your needs. For example, if you want to stand underneath, make sure the height, when combined with the distance below the mounting point, offers sufficient headroom. Off-the-shelf tops generally range from four to eight feet in length, with six-foot-long tops ranking as the most popular on runabouts. Choose a canvas color that coordinates well with the boat’s colors.
2. Position the Top Ask a buddy to hold the fully extended top in place as you decide where the deck hinges should be installed, knowing that these will mark the longitudinal midpoint of the top. It’s important that the deck hinges are exactly opposite and parallel to each other, lest the top would bind when folded. Side-mount deck hinges are available for mounting on vertical surfaces such as cabin bulwarks, if gunwale mounting won’t work. Make sure the folded top will stow with minimal interference in the cockpit.
3. Mount the Deck Hinges Place pieces of masking tape on the mounting surfaces and use the deck hinges to mark the mounting holes for each. Before drilling the mounting holes, be sure the underside is clear of items such as hoses and wires. After drilling, chamfer the holes with a countersink to eliminate gelcoat cracking, and then remove the masking tape, bed the surface with a marine polysulfide sealant and screw each deck hinge into place (use nuts and bolts where possible), cleaning up the excess sealant with a rag dampened with solvent.
4. Install the Top and Eye Straps Bolt the bases of the main bow to the deck hinges and erect the top, extending the fore and aft web straps in line with the legs of the bows to form an M-shape on each side. This will tell you where to mount the eye straps. Mark, drill, chamfer, bed and mount each pair (fore and aft) with self-tapping screws at the same position on each side of the boat. The eye straps work best when mounted horizontally. Attach the snap-hooks to the eye straps and use the buckles to evenly tighten the top.
Quick Tip: Pin Pal If stowing the top is a problem, mount a second pair of deck hinges and use quick-release “grenade” pins. This way, the top can be moved aft to where it folds out of the way.
Adjustable Aft Stays Instead of straps, some Bimini tops use telescoping aft stays, attached to the boat with deck hinges, to secure the main bow. Forward web straps keep things taut. A big advantage of this system is that you can fold back and store the Bimini in an elevated position, so as not to interfere with seating or deck space. With this system, it’s best to secure the canvas in a zippered boot (starting at $51.99, iboats.com ) when not in use.
More: diy projects , How-To , Weekend Workbook
More How To
On Board With: Monique Richter
Grady-White Pulls off Its Largest Raft-up Ever in Vieques, Puerto Rico
Installing Retractable Transom Straps
How to Choose a Trailer Winch
Boat Test: 2024 Hurricane SunDeck 2600 OB
Boat Test: 2024 Brabus Shadow 1200 Sun-Top
Inflatable Water Mats for Boaters
Boat Test: 2024 Monterey Elite 30
Digital Edition
Customer Service
Privacy Policy
Terms of Use
Cruising World
Sailing World
Salt Water Sportsman
Sport Fishing
Wakeboarding
Many products featured on this site were editorially chosen. Boating may receive financial compensation for products purchased through this site.
What is a Bimini on a Sailboat? And Why You Should Install One
So, you bought your new sailboat and can’t wait to set sail and explore the seas? Or are you thinking of ways to make new adjustments and install new gear on it? As you already know, weather conditions play a crucial role in sailing. Therefore, it is important to install some kind of protection on your boat so as not to get sunburned, wet, overheated, and drained. Because if you head out on the water without proper protection from natural phenomena this will likely put you at risk. So, installing a bimini top on your boat is a great choice so as to ensure protection from the sun and rain. Let’s see what exactly is a bimini top, how to install it, and some useful info about them. Keep reading!
What Exactly is a Bimini Top?
Bimini tops basically protect you and your sailboat from the elements. They create shade and at the same time retain visibility from the helm and allow the air to circulate. Generally, they’re inexpensive and easy to install on pontoons, powerboats, and sailboats. Most of the time, a bimini cover is an open-air canvas canopy that has sturdy metal frames supporting it. Moreover, it’s waterproof, free-standing, and has an open-front cover that protects several areas of your boat from the sun or rain. They also offer protection from the wind, spray, and saltwater when sailing.
There are biminis that have side panels to the top and are attached with either zippers or snaps. These biminis refer to a fully-enclosed bimini. You can choose between a wide range of colors, sizes, configurations, and fabrics that will suit your boat. Furthermore, biminis improve your sailboat’s cockpit, deck, and overall appearance. Lastly, accurate width, length, and height measurements are essential before installing a bimini on your sailboat.
What to Consider Before Installing a Bimini Top
Length: Your bimini’s length can be calculated by measuring the fore and aft area of the mounting point. For instance, a 6ft bimini covers 3ft in front and 3ft behind the mounts. You can also tailor the bimini’s length from 3 to 10ft. Usually an 8 or 10ft bimini is used on pontoon boats.
Width: Width is the most important measurement to take for installing a bimini. Your bimini’s frame width is estimated by measuring between the points where the mounts are connected to the gunwales. Remember, that this measurement is not equal to the boat’s beam. Widths are available in 6” ranges and frames can extend to 3″.
Height: Installing a high bimini means that you’ll have more headroom, especially in boats with low gunwales. In order to ensure an accurate height measurement, you can stand inside the boat and measure the vertical distance upward from the mounting points. Like this, you’ll determine how much headroom you can have. For instance, a pontoon boat uses a taller top whereas a ski boat will normally have a shorter bimini.
Fabrics: Always choose the bimini’s fabric according to the weather conditions that it will be exposed to. Also, the material has to be waterproof, strong, and able to withstand UV rays, and preferably double-stitched. Fabrics include canvas, vinyl, acrylic, mixed blends, and polyester. Keep in mind that sun exposure deteriorates the fabric’s water repellency and protection from the elements. So, regular maintenance of bimini tops will prolong their lifespan. Always, choose the right fabric treatment that will repel water, prevent staining, and restore UV resistance.
Bimini Configurations
Bimini tops come in two-, three-, and four-bow configurations, as described below. Remember that the maximum distance between the bows is generally 42″ or less. Bear in mind that you have to keep the spread between bows from getting too wide and thus preventing water from puddling between them. Let’s see the basic bimini configurations:
Two-bow : This configuration goes for jon boats as well as for shorter V-hull. They’re really cheap, lightweight, and provide protection for the whole boat’s area.
Three-bow : Three-bow configuration suits for V-hull, open deck boats, cuddy cabin boats, center consoled boats, and for all medium-sized vessels.
Four-bow : Four-bow configuration goes for pontoon, cabin cruiser, and longer center console boats. You can find them at 8ft or more in length and that is why they’re adequate for longer vessels.
Bimini Top Materials
In case you’re sailing in humid and hot climates then you should prefer a breathable fabric with high mildew and UV resistance. However, if you’re sailing in northern climates, where ice or snow is likely to accumulate on your bimini, you have to choose a highly waterproof fabric. Moreover, choose a material color that will match the boat’s hull or superstructure colors.
Woven acrylic: This fabric has a soft appearance and is water-resistant. Acrycil can endure UV rays and has excellent fade resistance and strength. However, every few years, the fabric has to be maintained or replaced. Also, woven acrylic is prone to leaking. Therefore, it has to be re-waterproofed after a thorough cleaning. Acrylic tops tend to be more expensive and not really abrasion-resistant like other fabrics. On the other hand, woven acrylic offers great breathability and resistance when exposed to the elements.
Vinyl: Vinyl fabrics for bimini tops, like Stamoid, are basically vinyl-coated fabrics. This type of fabric is highly preferred by sailors because when there’s too much water on top they immediately lead it for runoff from the sides. This material is durable, easy to clean, and has a long lifespan. A great advantage is that the composite’s vinyl component is highly water-resistant thus can withstand the rigors of the sea. It’s also less expensive than woven acrylic. However, vinyl biminis aren’t breathable.
Polyester: Polyester fabrics such as Top Gun, are solution-dyed fabrics and can excellently withstand exposure to UV-rays. Polyester bimini tops are strong and resist stretching thus they always maintain their shape. They tend to fade faster than other materials but are more abrasion resistant and water repellent.
Threads, Frames and Fittings
Generally, UV rays, rain, moisture, and other elements can damage the thread. And that’s why the thread that holds the bimini can be a weakness in the whole system. So, always choose a high-quality thread, like Tenara, that may be expensive but has a long lifespan and is extremely durable.
As for the bimini top frames you can choose between stainless steel or aluminum ones. Stainless steel is a sturdy material, corrosion-resistant, and more expensive than aluminum. Moreover, due to stainless steel strength, you can sail at high speeds and upwind without worrying about it falling apart. On the other hand, if you’re sailing in freshwater environments, aluminum is what you should choose and is generally more economical than stainless steel. Keep in mind that aluminum tubings have to be anodized in order to resist pitting and corrosion.
Fittings hold the bimini’s tubes and should always be made of high-quality stainless steel. Stainless steel fittings are durable and extremely strong; that’s why they’re always more expensive than others. For instance, coated brass fittings are cheap but they aren’t corrosion-resistant and are prone to breaking or deforming.
Bimini Tips for Maintenance
Once a month, check all deck fittings to ensure they’re tight enough.
Once a month, check screws and straps in order to see if the frame and canopy are properly secured to the boat.
Remove debris and dirt regularly from the fabric using a hose and then brush it with a soft sponge and biodegradable soap.
Depending on your bimini’s fabric, it’s advisable to remove the bimini when sailing over 30 knots. This is because some fabrics are unable to withstand high speeds.
Never leave the bimini top up year-round. Fold your bimini down when not in use and consider purchasing bimini boots in order to store the cover and protect it in the long-term.
Make sure that hold-down straps are tight. There should be minor or no slack at all in the hold-down straps when they’re attached to the gunwales.
When trailering consider folding the bimini to its lowest profile and then stow it in the storage boot.
A good tip for cleaning is to use a solution of lukewarm water and biodegradable soap. Then rinse thoroughly and allow it some minutes to dry. Moreover, a marine-grade fabric or a vinyl cleaner can efficiently remove dirt and stains.
In some cases, the combination of the bimini size, the boat’s position and weight, and the wind’s direction and strength might affect the boat handling. This is because the top tends to act as a kite which is a totally unsafe condition.
Make sure that the bimini’s position allows for 360-degree visibility from the helm, when deployed or stowed. It’s crucial to have a clear vision to the stern, forward, and to port in order to ensure safe operation.
So, why you should install a bimini top on your sailboat? Because bimini tops offer overall protection from the elements without enclosing your boat. Having a bimini top will provide you shade and protection both for you and for your sailboat’s cockpit and other areas. Biminis can be adjusted and you can also choose from a wide variety of sizes, fabrics, colors, configurations, and characteristics. They can also be mounted in different places on the boat so as to provide as much shade as possible. They can be deployed and folded down quite easily when needed. Additionally, you can use bimini boots for efficient storage so as to keep the canopy protected. So, installing a bimini is worth the investment especially if you’re sailing for most time of the year. Wish you safe and shady voyages!
Peter is the editor of Better Sailing. He has sailed for countless hours and has maintained his own boats and sailboats for years. After years of trial and error, he decided to start this website to share the knowledge.
Related Posts
Lagoon Catamaran Review: Are Lagoon Catamarans Good?
Best Inboard Boat Engine Brands
Are O’Day Sailboats Good? A Closer Look at a Classic Brand
Why Do Sailboats Lean?
Buyer's Guide
Destinations
Maintenance
Sailing Info
Hit enter to search or ESC to close.
CREATE AN ACCOUNT
Boat Cover Finder
Bimini Top Finder
Boat Propeller Finder
Engine Parts Finder
Anchor & Dock
Watersports
Clothing and Footwear
Engine Parts
Cabin and Galley
Covers and Biminis
Electronics
Paint and Maintenance
Pumps and Plumbing
Anchor Chains & Ropes
Boat Fenders
Boat Mooring
Boat Protection
Dock Storage & Protection
Ladders, Steps, & Platforms
Top Sellers
Fishing Rods
Fishing Reels
Fishing Rod & Reel Combos
Fishing Tools & Tackle Boxes
Fishing Line
Fly Fishing
Fishing Bait & Fishing Lures
Fishing Rod Holders & Storage Racks
Fish Finders, Sounders & Sonar
Trolling Motors
Fishing Nets
Fishing Downriggers & Acessories
Fishing Outriggers & Acessories
Fishing Kayaks
Fish Cleaning Tables
Inflatable Rafts
Paddle Boarding
Paddles & Oars
Wakeboard, Wakesurf & Ski
Wakeboard Towers
Tow Ropes & Handles
Life Jackets & PFDs
Snow Sports
Roof Racks, Carriers, Dollies
Men's Clothing
Accessories
Men's Footwear
Atheltic Shoes
Water Shoes
Women's Clothing
Dresses & Skirts
Women's Footwear
Fuel Systems
Sacrificial Anodes & Zincs
Generator Parts
Inflatable Boats
Propeller Parts & Accessories
Boat Manuals
PWC Parts & Accessories
Fishing Boat Seats
Offshore Boat Seats
Ski Boat Seats
Pontoon Boat Seats & Furniture
Boat Seat Pedestals & Hardware
Boat Seats by Manufacturer
Boat Tables & Hardware
Boat Seat Covers
Boat Seat Vinyl
Floating Boat Cushions
Barbeque Grills
Boat Drink Holders
Cabin Accessories & Hardware
Boat Ventilation
Interior & Cabin Lighting
Marine Teak Products
Carbon Monoxide & Smoke Detectors
Binoculars & Telescopes
Boat Bimini Tops
Bimini Top Accessories
Pontoon Bimini Tops
Other Biminis
RV & Trailer Covers
Boat Shrink Wrap & Accessories
Boat Shelters
Boat Covers
Boat Cover Accessories
Boat Lift Canopy Covers
Other Covers
Boat Wiring & Cable
Marine Batteries & Accessories
Marine DC Power Plugs & Sockets
Marine Electrical Meters
Boat Lights
Marine Electrical Panels & Circuit Breakers
Power Packs & Jump Starters
Marine Solar Power Accessories
Marine Electrical Terminals
Marine Fuse Blocks & Terminal Blocks
Marine Switches
Shore Power & AC Distribution
Marine Audio & Video
GPS Chartplotters & Accessories
Electronic Navigation Charts & Software
Digital Instruments
Display Mounts
VHF Radios & Communication
Marine Radar
Auto Pilot Systems
Action Cameras
Fiberglass & Epoxy Boat Repair
Boat Paint & Varnish
Marine Adhesives, Sealant, & Caulking
Marine Engine Maintenance
Boat Cleaners & Waxes
Boat Cleaning Supplies
Fresh Water Boat Systems
Bilge Pumps
Marine Plumbing Parts
Wash Down Pumps
Livewell Aerator Pumps & Live Bait Wells
Toilet & Waste Pumps
Marine Pump Replacement Parts
Tires, Rims, & Hub Kits
Boat Trailer Winches
Boat Motor Supports & Transom Savers
Boat Trailer Guides & Rollers
Boat Trailer Fenders
Boat Trailer Lights
Boat Trailer Hardware
Boat Trailer Jacks
Boat Trailer Brakes & Axles
Boat Trailer Tie Downs
Couplers, Mounts, Hitches, & Locks
Boat Deck Harware
Marine Nuts, Bolts, & Screws
Boat Handles, Pulls, & Rings
Prop Nut Kits & Hardware
Boat Cabin Hardware
Marine Fasteners
Boat Windshield Parts
Boat Tubing & Rails
Boat Mirrors
Marine Tools & Tool Kits
Boat Lettering
Women's Clothing Deals
Men's Clothing Deals
Fishing Deals
Anchor & Dock Deals
Electrical Deals
Electronics Deals
Paint & Maintenance Deals
Pumps & Plumbing Deals
Boat Seats Deals
Trailering Deals
Camping & RV Deals
Dealer Login
Forums Login
Search forums
The iboats forum moderators are excited to announce that at this time it appears the iboats forums posting pictures function is working once again. Though we cannot promise for how long, we're hoping for indefinitely.
General Boating/Outdoors Activities
Boat Topics and Questions (not engine topics)
Homemade Bimini??? Has anyone tried to do this?
Thread starter NetDoc
Start date Dec 7, 2011
Chief Petty Officer
Dec 7, 2011
Pricing out Biminis has shocked me. They are little more than a tarp, but the prices are exorbitant. Anyone have any stories about making the cover and/or frames? I am thinking about using PVC for the poles and have no idea what to use for the cover.
Senior Chief Petty Officer
Re: Homemade Bimini??? Has anyone tried to do this? How about purchasing an "Anchor Shade", I bought mine from I boats for around $150 I believe? works just like a Bimini, just not to be used when under power!
IslandManMitch
Petty officer 3rd class.
Re: Homemade Bimini??? Has anyone tried to do this? I need to replace just the canvas on my pontoon boat and was surprised at the price. I have some aluminum awning metal that I'm thinking about screwing to my frame for a lightweight hard top.
UncleWillie
NetDoc said: Pricing out Biminis has shocked me. They are little more than a tarp, but the prices are exorbitant. Anyone have any stories about making the cover and/or frames? I am thinking about using PVC for the poles and have no idea what to use for the cover. Click to expand...
Re: Homemade Bimini??? Has anyone tried to do this? I think I got mine for $225 to $300. Boat stuff can go for a lot, though I thought it wasn't that bad of a price for the bimini kit.
smokeonthewater
Fleet admiral.
Re: Homemade Bimini??? Has anyone tried to do this? I'd hit C/L and fleabay way before I'd mess with pvc and tarps
Home Cookin'
Re: Homemade Bimini??? Has anyone tried to do this? this bimini top was in my local craigs list the other day. maybe ya can do something with that.
Re: Homemade Bimini??? Has anyone tried to do this? Have you checked with Blackbeard Marine Towing & Salvage in Key Largo and google around for other salvage yards would be your cheapest best option.
Re: Homemade Bimini??? Has anyone tried to do this? I say spend the money and do it right. You don`t want to be the boat that everyone points to and laughs. I`d rather go without that to half asp it.
IOW your homemade rig will look like crap. Click to expand...
Ayuh,.... All homemade, No pvc... Click to expand...
Adam76 said: That looks great Bond-o, i s the top solid or a tarp . Click to expand...
Rear Admiral
Re: Homemade Bimini??? Has anyone tried to do this? Bimini tops, complete with frames are all around $275 up here (Daytona area)
cobaltboats
Dec 8, 2011
Re: Homemade Bimini??? Has anyone tried to do this? I would try ebay, I see cheaper newer tops you may be able to use. You get what you pay for. I would consider a kit with the cheaper fabric so it fits right before a homemade one.
Supreme Mariner
Re: Homemade Bimini??? Has anyone tried to do this? I'm pleased with the inexpensive one I got here http://www.safeguardcovers.com/v/vspfiles/biminis/biminis.asp
Re: Homemade Bimini??? Has anyone tried to do this? Bond-o, your "homemade" looks great, but it also hardly looks "home made." I'd call it "custom." But certainly not the "homemade" look I see often. And I am sure your time a materials cost more than a bimini, which was the OP's point.
Home Cookin' said: Bond-o, your "homemade" looks great, but it also hardly looks "home made." I'd call it "custom." But certainly not the "homemade" look I see often. And I am sure your time a materials cost more than a bimini, which was the OP's point. Click to expand...
Petty Officer 1st Class
Re: Homemade Bimini??? Has anyone tried to do this? This is actually a project me and my father plan on doing to my 26ft cruiser. We intend on making something similar to Bond-o. But we will use Pressure Treated/Marine Grade/Oak wood and cover it with fiberglass epoxy. For us working with wood is much more simpler then metal. The quick anwer to the OP is, yes its doable. IMO stay way from PVC to support anything, its lightweight plastic which is prone to fail....
New Sailboats
Sailboats 21-30ft
Sailboats 31-35ft
Sailboats 36-40ft
Sailboats Over 40ft
Sailboats Under 21feet
used_sailboats
Apps and Computer Programs
Communications
Fishfinders
Handheld Electronics
Plotters MFDS Rradar
Wind, Speed & Depth Instruments
Anchoring Mooring
Running Rigging
Sails Canvas
Standing Rigging
Diesel Engines
Off Grid Energy
Cleaning Waxing
DIY Projects
Repair, Tools & Materials
Spare Parts
Tools & Gadgets
Cabin Comfort
Ventilation
Footwear Apparel
Foul Weather Gear
Mailport & PS Advisor
Inside Practical Sailor Blog
Activate My Web Access
Reset Password
Customer Service
Free Newsletter
Blue Jacket 40 Used Boat Review
Catalina 270 vs. The Beneteau First 265 Used Boat Match-Up
Ericson 41 Used Boat Review
Mason 33 Used Boat Review
How to Create a Bullet-Proof VHF/SSB Backup
Tips From A First “Sail” on the ICW
Tillerpilot Tips and Safety Cautions
Best Crimpers and Strippers for Fixing Marine Electrical Connectors
Polyester vs. Nylon Rode
Getting the Most Out of Older Sails
How (Not) to Tie Your Boat to a Dock
Stopping Mainsheet Twist
Fuel Lift Pump: Easy DIY Diesel Fuel System Diagnostic and Repair
Ensuring Safe Shorepower
Sinking? Check Your Stuffing Box
What Do You Do With Old Fiberglass Boats?
Boat Repairs for the Technically Illiterate
Boat Maintenance for the Technically Illiterate
Whats the Best Way to Restore Clear Plastic Windows?
Stopping Holding-tank Odors
Giving Bugs the Big Goodbye
Galley Gadgets for the Cruising Sailor
The Rain Catcher’s Guide
Sailing Gear for Kids
What’s the Best Sunscreen?
UV Clothing: Is It Worth the Hype?
Preparing Yourself for Solo Sailing
R. Tucker Thompson Tall Ship Youth Voyage
On Watch: This 60-Year-Old Hinckley Pilot 35 is Also a Working…
On Watch: America’s Cup
On Watch: All Eyes on Europe Sail Racing
Dear Readers
Sails, Rigging & Deck Gear
Custom-Made Hard Top Biminis
I was wondering if there is any information regarding the protocol for replacing canvas with a rigid Bimini/dodger on a small 36-foot catamaran. I could not find a review of solid Bimini replacements. We have strong stainless steel frames. They are fixed with metal struts with no flexible straps. I do want to be able to see the sails from the helm and bulkhead mount. I want to be able to take advantage of roll up clear plastic front and side curtains. Most summers my current set stays in the rolled up position. They have since shrunk enough that they can no longer be fully snapped.
I am looking for some material that is relatively light with strength. Is there any info on the polycarbonate tops such as the Hard to Top system ( www.hardtotop.com )? It seems to be light and strong, translucent. It comes in several panels to make up the necessary width. Is there any other material options that combine light weight and strength? The solid plastic systems seem to be very heavy per square foot.
Bill Hudson
Half Moon, Endeavour Cat 36
Because these are semi-custom jobs, we havent done a dedicated review of hard-top Bimini options, but this topic is definitely worth a closer look. Hard tops are so popular among warm-water cruising catamarans that they are standard on most of the boats you see today. Retrofitting one on an older boat, however, deserves some careful thought. Your concern about weight is on target. On a catamaran like yours, the weight of the top and the structure begins to add up quickly-as does cost.
Because the Hard to Top System can be incorporated into an existing Bimini frame, it would appear to be a cost effective option, but wed be concerned about longevity of any plastic, and the translucent nature of the material seems to defeat the purpose of a Bimini, which is to create shade.
A canvas Bimini offers many advantages over a rigid one, especially to offshore sailors. Importantly, you can fold it down or remove it in a gale, when the windage of a permanent hard top can affect the boats trim and balance. And Bimini tops almost always interfere with access to the mainsail. You can usually zip out a panel of a canvas Bimini, or remove it completely as needed.
A hard dodger (as opposed to a Bimini) is less intrusive. Weve seen several custom , lightweight designs with low profiles that provide four-season protection and look terrific. For many boats, a good compromise is a hard dodger top (usually custom made), with canvas sides and clear vinyl front panels. We recently compared three types of popular clear vinyl glazing: Strataglass, OSea , and Regalite (see PS January 2014, How do Different Vinyl Types Compare? ). And this month we look at the long-term results of our canvas test.
To get a better picture of the pros and cons of hard top versus a conventional canvas top, we will begin a survey of various custom shops that offer hard tops and dodgers and compare costs and materials. The more sensible hard Bimini tops that weve seen for catamarans incorporate lightweight cored panels and aircraft-grade anodized aluminum supports. Atlantic Towers in Bayville, New Jersey ( www.atlantictowers.com ) has a number of custom sailboat jobs to its credit. In Southwest Florida, we would recommend JTR Enterprises ( www.jtrmarine.com ), the family-run welding company in Gulfport that rigged the early Endeavours.
Two companies we are familiar with fabricate hard-tops and dodgers using thermoformed ABS plastic: Cruising Hardtops ( www.cruisinghardtops.com ) and Shipshape Canvas ( www.shipshape.canvas.com ). However, as you pointed out, these tops are heavier than comparable designs using cored panels.
Just about any region in the country is home to at least one custom welder/fabricator who can help you come up with design . The aim would be to keep weight minimal without breaking the bank. Wed invite any comments from owners who have retrofitted their boats with hard tops and have advice on this topic.
RELATED ARTICLES MORE FROM AUTHOR
Leave a reply cancel reply.
Log in to leave a comment
Latest Videos
Cabo Rico 34 Boat Review
Super Shallow Draft Sailboat: The Leeboard Sharpie
Hans Christian 41T – Boat Review
Seven dead after superyacht sinks off Sicily. Was the crew at...
Latest sailboat review.
Privacy Policy
Do Not Sell My Personal Information
Online Account Activation
Privacy Manager
Remember me Not recommended on shared computers
Forgot your password?
Or sign in with one of these services
Tower / Racks / Bimini Projects
Share your completed boat projects! DIY or Professional Installs
Imagine a single giant database of boat projects for all brands, organized by category, boat type or budget. Share your projects, find inspiration for a new upgrade, or learn the basics or low budget solutions from projects before you. We can all share and learn from each other in one place. No project is too plain, cheap or lame to post... all will be helpful to someone. Let's build this thing! Please register or log in first:
1) Pick a category
2) Click "Add New Project"
3) Update your project anytime!
***Professional Shops are also welcome to showcase custom work for any category, but you must designate your company name under "installation shop" with included info.
DIY Bimini top
By Toddington111
November 30, 2020
Made the frame out of 3/4" .035 wall 304 stainless steel tubing. I had a canvas place Sew up some sunbrella material to fit.
Report Project
User Feedback
Recommended comments, macdaddy 27.
Posted November 30, 2020
Report reply
Share this comment
Very nice job. Can you break it down to tow with it? Still, very nice!!
Link to comment
Share on other sites, toddington111 25.
You tow with it on, the pylon and the light sticks through the top and there's a hand hole to connect the tow rope. It's nice because it's so big that it holds the rope up so it doesn't hit the people in the back seat when it's slack.
Posted December 2, 2020
Damn, nice work.
Posted January 2, 2021
Looks great! How are you holding on the fabric/keeping it tensioned? I bought a large universal bimini and the fabric velcros on so I can't get it super tight and it collects water when it rains. I'm thinking of adding a few more hoops and making a cover I can tension to help shed water.
Posted January 4, 2021
3 sets of zippers 2 in the front and 1 log one in the back in the rest of it's all velcroed around the bars. I also ran the tubing around the perimeter for my sprayers. I put a tee every place the velcro or zipper had a gap in it there's 8 spray heads around it run in 1/4" tube with a small ebay pump and a 5 gas water can. The can is more than enough for a day on the water
Create an account or sign in to comment
You need to be a member in order to leave a comment
Create an account
Sign up for a new account in our community. It's easy!
Already have an account? Sign in here.
Featured Products
LARGE - XL (7 5/8" - 8") Wake Garage Vintage cap
Wake Garage decal - Metallic Red
Wake Garage decal - Metallic Blue
Wake Garage decal - Black
Wake Garage decal - White
Wake Garage decal - Orange
ADJUSTABLE Charcoal/Neon Blue Wake Garage Snapback
ADJUSTABLE Charcoal/Neon Orange Wake Garage Snapback
Diy bimini sailboat ~ Best wood for building a boat
How to Make a Bimini
How-to: Build a hardtop bimini on your sailboat
DIY Bimini Top Build
Sailboat bimini top kits ~ Lapstrake boat diy
DIY Bimini Sailboat Shade
VIDEO
Sewing Exterior Fabric (like Sunbrella), DIY Bimini Top
DIY sailboat Bimini top sewing
2023 DIY: How I Installed a Tower Bimini on a Yamaha AR230 Boat
Foldable Bimini Top Boat Cover DIY-Reseña
Bimini Top Setup and Strap Upgrade
The Irwin Sailboat DIY Restoration Project WEEK 39 Hard Top Bimini on Our Sailboat Part 1 (Ep. 63)
COMMENTS
How to make your own Bimini tutorial
Thinking about making your own Bimini? See how the pros do it!There are a few tips and tricks you will learn as well as seeing what's involved and what you'l...
How-to: Build a hardtop bimini on your sailboat
The hardest, and best addition during the refit. THE hardtop vid. I couldn't find anything like this while I needed it, so I hope it helps someone. Love, pea...
Make This Boom Tent: the Poor Man's Bimini
For example, a blue tarp and bungees with white PVC pipe. Here's how to set it up: 1. Flake and tie the mainsail compactly to the boom. Use your mainsail cover normally, if you want. 2. Standing in the cockpit, drape the tarp lengthwise over the mainsail and boom. 3.
Building a Bimini from scratch
Boat: Outremer 55L. Posts: 4,008. Building a Bimini from scratch. Looks really good. In addition to the bracing comment (just think how much load there's going to be when you're heeled!), I would also suggest redoing your edges. Those grommets are going to pull out as the tension loads are very high - you can see the scalloping already.
How to Make a Bimini
Think again. With step-by-step video tutorials and high-quality bimini kits from Sailrite®, creating a new bimini (or replacing the frame or top of an existing one) has never been easier. On our website, you'll find 2-, 3- and 4-bow Bimini Frame Kits in both stainless steel and aluminum to fit any environment or budget.
Building a Sailrite 3-Bow Bimini
The reason this kit is DIY-able is that the bimini bows are shipped in 3 pieces. This caused us some serious hesitation at first. We really wanted a single piece bow that was custom bent to match the lines of our boat. ... I had salvaged some stainless steel bows and hardware from a local marina and was setting up a bimini on the pontoon boat ...
Homemade Hardtop
For boats that keep the spray dodger and bimini top up all the time, replacing the fabric with inexpensive, easy-to-work FRP panels is an alternative worth considering. It's a simple, straightforward project that provides lasting benefits. ... A DIY Renovation Story Rigging Redo: Our Switch to Synthetic Top Tools for Sailboat Cruising: Must ...
How to Make a 3-Bow Bimini Top
Never miss sale announcements, how-to blogs, new product launches, helpful tutorials and more! A bimini serves as a protective barrier against the sun, rain and spray that you may encounter while on the water.
How to Pattern for a Bimini on a Boat
http://www.sailrite.com/Building-a-3-Bow-Bimini-Kit-DVD Sailrite sells bimini kits for the DIY boater. Each bimini kit comes with well illustrated written in...
5 DIY Boat Bimini Top Ideas & Expert Tips to Master the Wave!
4. DIY boat bimini top. When building your own boat bimini top project, you have the power to customize the dimensions and style to fit your boat's exact specifications. Once you've constructed the sturdy frame, it's time to focus on the next crucial step: choosing a high-quality fabric to ensure maximum comfort and durability.
Bimini & Dodger
Bimini & Dodger. Enjoy total coverage and customization with DIY bimini and dodger kits from Sailrite. Quality marine grade fabric and hardware will shield you from the sun, rain and wind so you can relax on your boat in style. With dozens of fabric colors to choose from, you'll be the envy of the marina!
Designing Boat Biminis Right First Time Is Not Easy!
If the boat bimini mounting point is inboard of the winches, then the limitations caused by the headsail sheet leads will not apply. But the bimini will be narrower and the shaded area below smaller. If it folds forward it must not fall across the companionway, or foul a mainsheet traveller mounted at the forward end of the cockpit.
Building a Custom Bimini Top
Store the bimini top properly: When not in use, store your bimini top in a protective cover or boot to keep it clean and protected from the elements. Conclusion. Building a custom bimini top for your boat is a rewarding and cost-effective DIY project that can greatly enhance your boating experience.
Upgrade to a Bimini Top on a Budget
The Stainless boat Bimini top hinged jaw slide 1″ 25 mm I purchased from Discount Marine Store on Amazon. They had the best price that I could find at the time. Here's a link: ... Your blog is a wealth of Catalina DIY information, with a great emphasis on cost reduction! You're most appreciated!
Installing A Bimini
Apply marine-grade silicone sealant or butyl tape to the mounting surface and secure each deck hinge into place using high-grade stainless nuts and bolts. 4. Install The Strap Eyes. With the main bow secured to the deck hinges, deploy the top, and extend the fore and aft web straps to create an M-shape on each side.
diy hard top bimini
Cut to size to include a light frame rabbetted around the exposed edges made of something like spruce or cedar (also available at the box store). Use a strong waterproof glue, Gorilla glue, Titebond 3, epoxy. Finish the whole top with epoxy base-coat, then paint or varnish.
DIY Bimini Top Installation
Slide them together, align a couple of screw holes at each connection and secure them with number 12 aluminum screws. (Be careful not to over-tighten and strip the threads—aluminum is a soft metal.) My top, an 8-footer (2.44 m), had four bows. Bimini installation kits include everything right down to the necessary Allen-type wrenches and ...
Installing A Bimini Top
Installing A Bimini Top Boating Magazine. 1. Select the Size. The width of the top is determined by the measurement between the points where the two deck hinges will attach, but the length and height can be varied to suit your needs. For example, if you want to stand underneath, make sure the height, when combined with the distance below the ...
What is a Bimini on a Sailboat? And Why You Should Install One
Bimini tops basically protect you and your sailboat from the elements. They create shade and at the same time retain visibility from the helm and allow the air to circulate. Generally, they're inexpensive and easy to install on pontoons, powerboats, and sailboats. Most of the time, a bimini cover is an open-air canvas canopy that has sturdy ...
Homemade Bimini??? Has anyone tried to do this?
Clamp the end of a long piece to a table and in a few days the other end will be on the floor. It will bend and just keep bending. If you have more time than money, find a local boat bone yard. Salvage a set of poles and hardware. Use the remains of the canvas as a template for a new top. Sew up a new one.
Custom-Made Hard Top Biminis
A canvas Bimini offers many advantages over a rigid one, especially to offshore sailors. Importantly, you can fold it down or remove it in a gale, when the windage of a permanent hard top can affect the boats trim and balance. And Bimini tops almost always interfere with access to the mainsail. You can usually zip out a panel of a canvas Bimini ...
How to Make a 3 Bow Bimini Top
A bimini top provides protection from the sun and shelter from rain and spray. In this video tutorial we will show you how to make a 3 bow bimini top. This i...
DIY Bimini top
DIY Bimini top Share your completed boat projects! DIY or Professional Installs. Imagine a single giant database of boat projects for all brands, organized by category, boat type or budget. Share your projects, find inspiration for a new upgrade, or learn the basics or low budget solutions from projects before you. ...


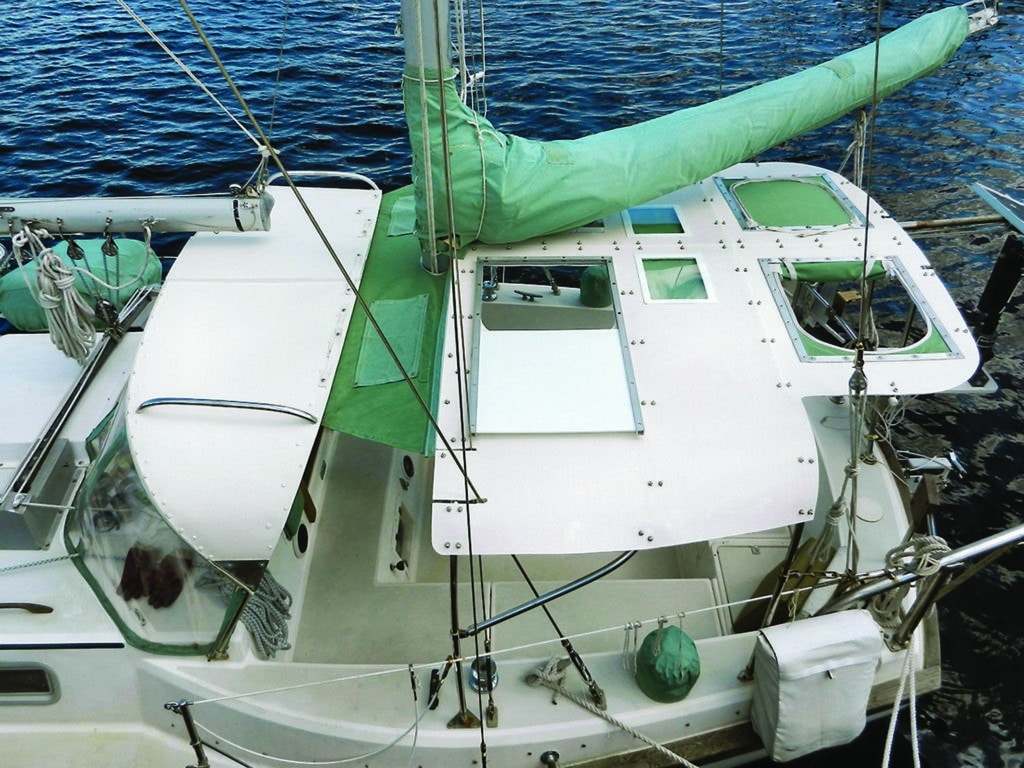


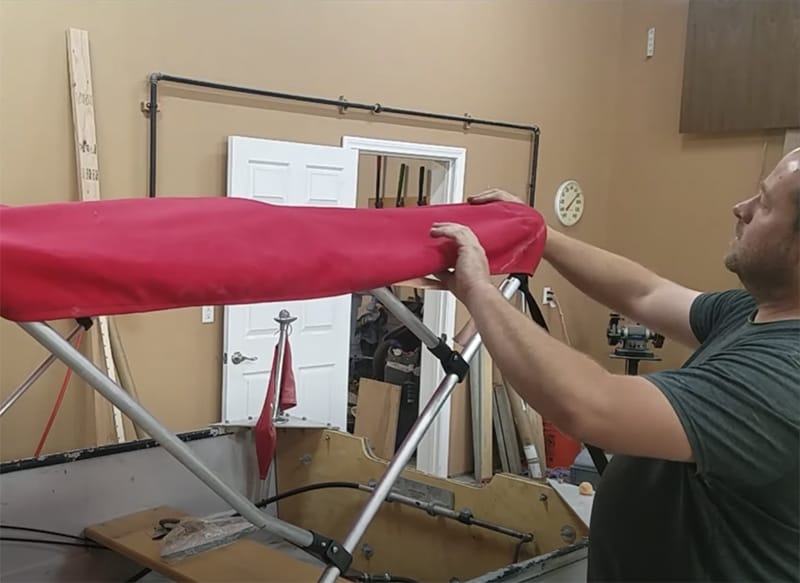
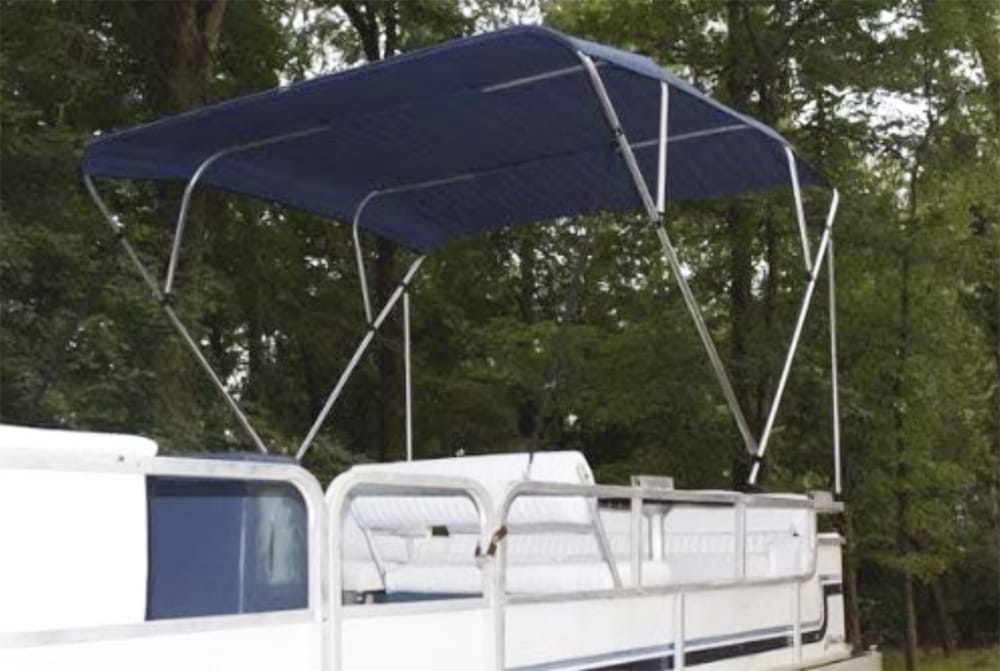

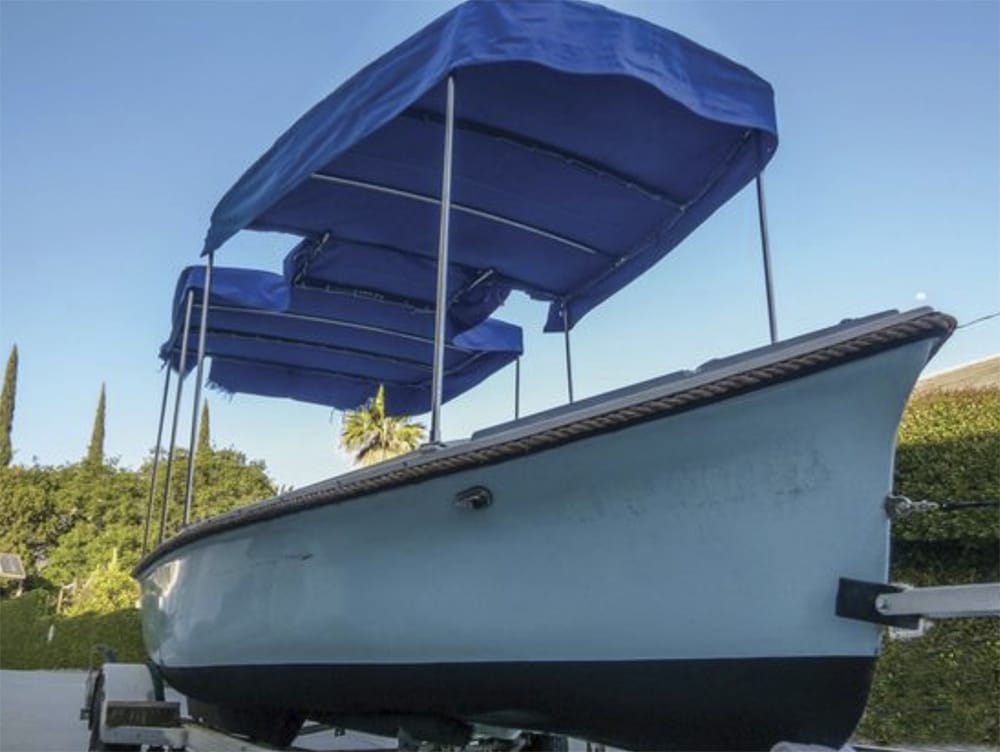


.thumb.jpeg.d318255b96edd9f88e9a0da37ff83595.jpeg "diy sailboat bimini")


.thumb.jpg.d6e1f49476f0797b86e8afb53e7c3295.jpg "diy sailboat bimini")


IMAGES
VIDEO
COMMENTS
Thinking about making your own Bimini? See how the pros do it!There are a few tips and tricks you will learn as well as seeing what's involved and what you'l...
The hardest, and best addition during the refit. THE hardtop vid. I couldn't find anything like this while I needed it, so I hope it helps someone. Love, pea...
For example, a blue tarp and bungees with white PVC pipe. Here's how to set it up: 1. Flake and tie the mainsail compactly to the boom. Use your mainsail cover normally, if you want. 2. Standing in the cockpit, drape the tarp lengthwise over the mainsail and boom. 3.
Boat: Outremer 55L. Posts: 4,008. Building a Bimini from scratch. Looks really good. In addition to the bracing comment (just think how much load there's going to be when you're heeled!), I would also suggest redoing your edges. Those grommets are going to pull out as the tension loads are very high - you can see the scalloping already.
Think again. With step-by-step video tutorials and high-quality bimini kits from Sailrite®, creating a new bimini (or replacing the frame or top of an existing one) has never been easier. On our website, you'll find 2-, 3- and 4-bow Bimini Frame Kits in both stainless steel and aluminum to fit any environment or budget.
The reason this kit is DIY-able is that the bimini bows are shipped in 3 pieces. This caused us some serious hesitation at first. We really wanted a single piece bow that was custom bent to match the lines of our boat. ... I had salvaged some stainless steel bows and hardware from a local marina and was setting up a bimini on the pontoon boat ...
For boats that keep the spray dodger and bimini top up all the time, replacing the fabric with inexpensive, easy-to-work FRP panels is an alternative worth considering. It's a simple, straightforward project that provides lasting benefits. ... A DIY Renovation Story Rigging Redo: Our Switch to Synthetic Top Tools for Sailboat Cruising: Must ...
Never miss sale announcements, how-to blogs, new product launches, helpful tutorials and more! A bimini serves as a protective barrier against the sun, rain and spray that you may encounter while on the water.
http://www.sailrite.com/Building-a-3-Bow-Bimini-Kit-DVD Sailrite sells bimini kits for the DIY boater. Each bimini kit comes with well illustrated written in...
4. DIY boat bimini top. When building your own boat bimini top project, you have the power to customize the dimensions and style to fit your boat's exact specifications. Once you've constructed the sturdy frame, it's time to focus on the next crucial step: choosing a high-quality fabric to ensure maximum comfort and durability.
Bimini & Dodger. Enjoy total coverage and customization with DIY bimini and dodger kits from Sailrite. Quality marine grade fabric and hardware will shield you from the sun, rain and wind so you can relax on your boat in style. With dozens of fabric colors to choose from, you'll be the envy of the marina!
If the boat bimini mounting point is inboard of the winches, then the limitations caused by the headsail sheet leads will not apply. But the bimini will be narrower and the shaded area below smaller. If it folds forward it must not fall across the companionway, or foul a mainsheet traveller mounted at the forward end of the cockpit.
Store the bimini top properly: When not in use, store your bimini top in a protective cover or boot to keep it clean and protected from the elements. Conclusion. Building a custom bimini top for your boat is a rewarding and cost-effective DIY project that can greatly enhance your boating experience.
The Stainless boat Bimini top hinged jaw slide 1″ 25 mm I purchased from Discount Marine Store on Amazon. They had the best price that I could find at the time. Here's a link: ... Your blog is a wealth of Catalina DIY information, with a great emphasis on cost reduction! You're most appreciated!
Apply marine-grade silicone sealant or butyl tape to the mounting surface and secure each deck hinge into place using high-grade stainless nuts and bolts. 4. Install The Strap Eyes. With the main bow secured to the deck hinges, deploy the top, and extend the fore and aft web straps to create an M-shape on each side.
Cut to size to include a light frame rabbetted around the exposed edges made of something like spruce or cedar (also available at the box store). Use a strong waterproof glue, Gorilla glue, Titebond 3, epoxy. Finish the whole top with epoxy base-coat, then paint or varnish.
Slide them together, align a couple of screw holes at each connection and secure them with number 12 aluminum screws. (Be careful not to over-tighten and strip the threads—aluminum is a soft metal.) My top, an 8-footer (2.44 m), had four bows. Bimini installation kits include everything right down to the necessary Allen-type wrenches and ...
Installing A Bimini Top Boating Magazine. 1. Select the Size. The width of the top is determined by the measurement between the points where the two deck hinges will attach, but the length and height can be varied to suit your needs. For example, if you want to stand underneath, make sure the height, when combined with the distance below the ...
Bimini tops basically protect you and your sailboat from the elements. They create shade and at the same time retain visibility from the helm and allow the air to circulate. Generally, they're inexpensive and easy to install on pontoons, powerboats, and sailboats. Most of the time, a bimini cover is an open-air canvas canopy that has sturdy ...
Clamp the end of a long piece to a table and in a few days the other end will be on the floor. It will bend and just keep bending. If you have more time than money, find a local boat bone yard. Salvage a set of poles and hardware. Use the remains of the canvas as a template for a new top. Sew up a new one.
A canvas Bimini offers many advantages over a rigid one, especially to offshore sailors. Importantly, you can fold it down or remove it in a gale, when the windage of a permanent hard top can affect the boats trim and balance. And Bimini tops almost always interfere with access to the mainsail. You can usually zip out a panel of a canvas Bimini ...
A bimini top provides protection from the sun and shelter from rain and spray. In this video tutorial we will show you how to make a 3 bow bimini top. This i...
DIY Bimini top Share your completed boat projects! DIY or Professional Installs. Imagine a single giant database of boat projects for all brands, organized by category, boat type or budget. Share your projects, find inspiration for a new upgrade, or learn the basics or low budget solutions from projects before you. ...